How do you go about testing a new clay? I will show you step-by-step and how to document every step in your account at insight-live.com. Be warned, it is hard work. There are things to be learned and noted at every step of the way. But that is the key to success.
With clay bodies we are concerned with physics, not chemistry. We worry about things like drying shrinkage, drying performance, particle size distribution, plasticity, firing shrinkage, fired porosity, fired color, soluble salt content, fired strength, etc. These properties are not closely related to chemistry, I simply need to measure them. In doing so I am "characterizing" the material, comparing it with all the clays that I have already tested. Initially I want to answer simple questions related to how it forms, dries and fires across a range of temperatures. But later, if it has unusual properties, I am interested in what special applications it might work for.
In doing the testing I will be generating alot of data. No single factor is more intimidating to new technicians than what do to with this data, how to store it so that it can be compared effectively with other clays. An account at Insight-live.com is the answer as we shall see.
Samples recieved
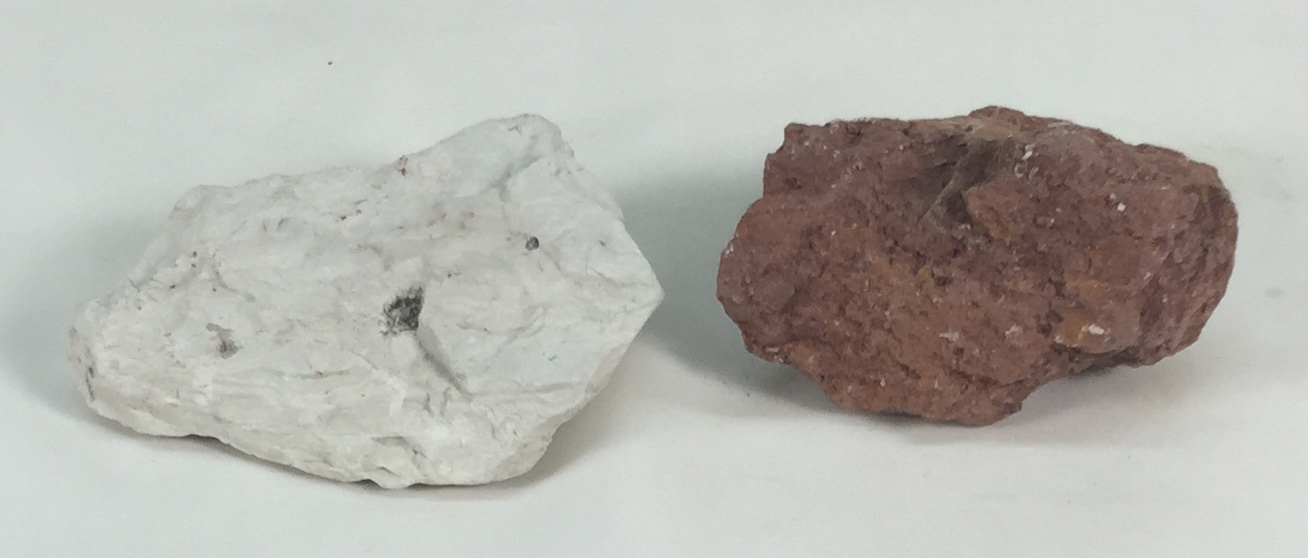
A gravel company in the north central US found this in their pit. They have sent two samples: one from the pit wall and one from the base. One of the samples is dry, it is from the pit floor and has likely dried in the sun. The other is from the pit wall, likely from a fresh cut, so it represents how wet the material will be when extracted.
There is a large deposit, they claim it is fairly consistent and they have the equipment to stockpile it. First, they want to know if it is a ball clay. Ball clays are used in large tonnages for products in a wide array of industries. Ball clays are mined in the south eastern US and shipped long distances, it is common for the freight charges to exceed the cost of the clay itself. So if a good deposit could be developed in their location the potential sales in the west of North American would be very high.
The USGS Mineral Commodity Report reports one million of tons of ball clay are produced in the US every year. But twice that much Fuller's Earth is produced and sells for more than twice the price! So can we identify this material as either of the above? Or will it be a fire clay or a common clay or a pottery clay? We shall see.
Creating a new recipe in Insight-live
Where do I put all the data that I am going to be measuring? Into a recipe in my account at Insight-live.com. I have just clicked the green Add button in the recipe manager in my Insight-live account (notice than panel is titled "Our Recipes"; this is because I am working in a group account. It responded by creating a new empty record and a panel for it to the right (which is currently in Open mode, we will see its other modes Preview and Edit shortly).
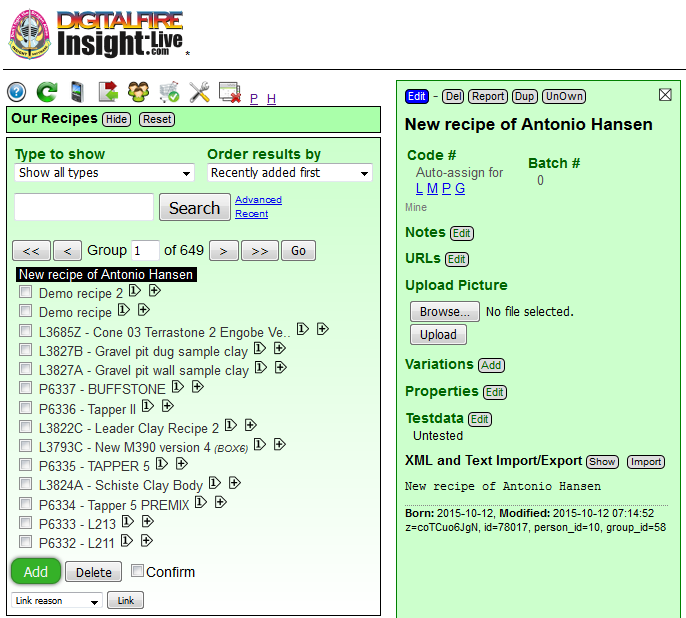
This is a material, why am I adding it as a recipe? Because Insight-live is recipe-centric (and so is the ceramic world). Actually, this is a recipe; it just has one ingredient. Subsequent tests are going to involve adding things to this to see how it works with other materials, those are obviously going to be recipes.
I will click the blue Edit button.
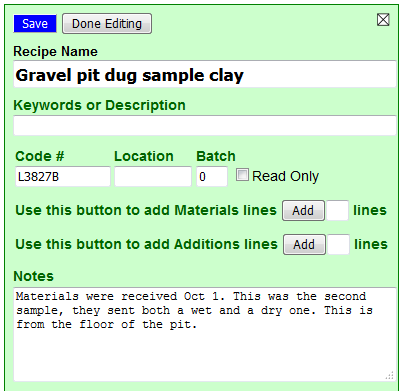
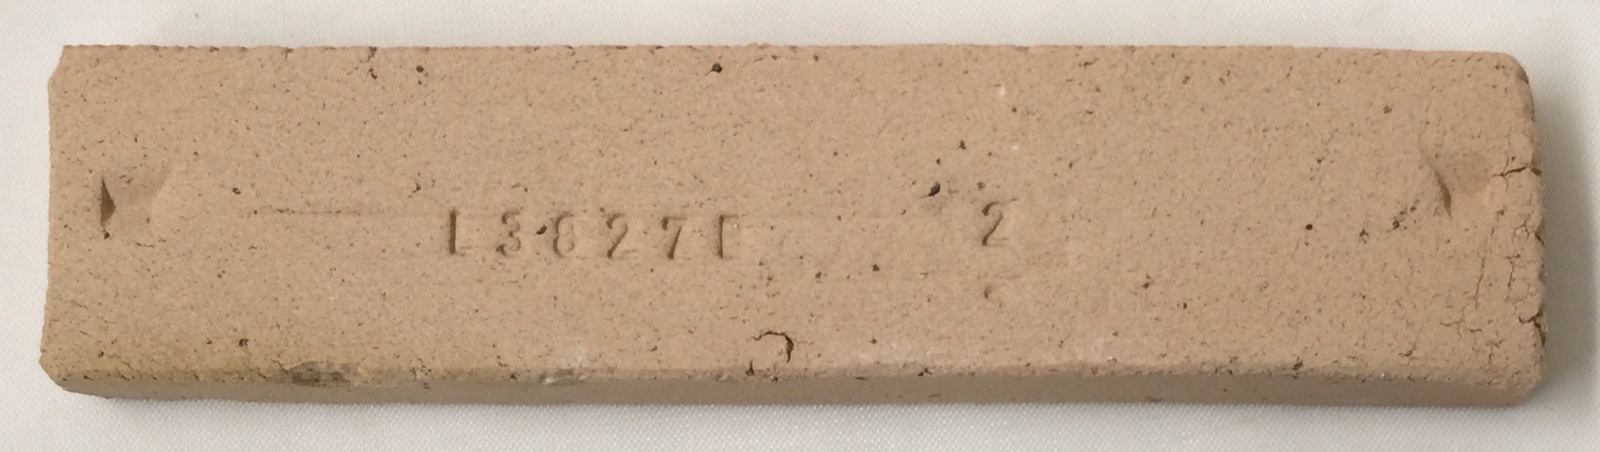
I have filled in a name and a note about what I know to this point (I will be editing and adding to that note through-out the process in the coming weeks). I have also given it a code number (I will be stamping that on all the test specimens). I have found that a four-digit number is best for sorting. In 30 years I have done about 10,000 tests and I have found that a four digit number followed by a letter works well. I coded the other clay they provided as L3827A. When I start adding other materials to this to see what I can do with it, their code numbers will be C, D, E, etc.
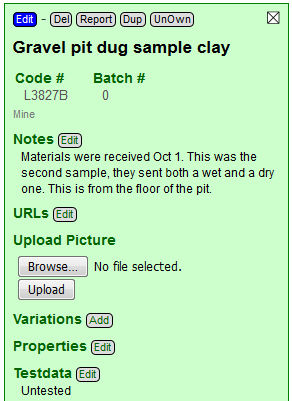
I have clicked the Done Editing button (beside the blue Save button). That put the recipe back into Open mode. Notice that in this mode there are buttons to add URLs, pictures, variations, properties and test data.
Measuring powder water content
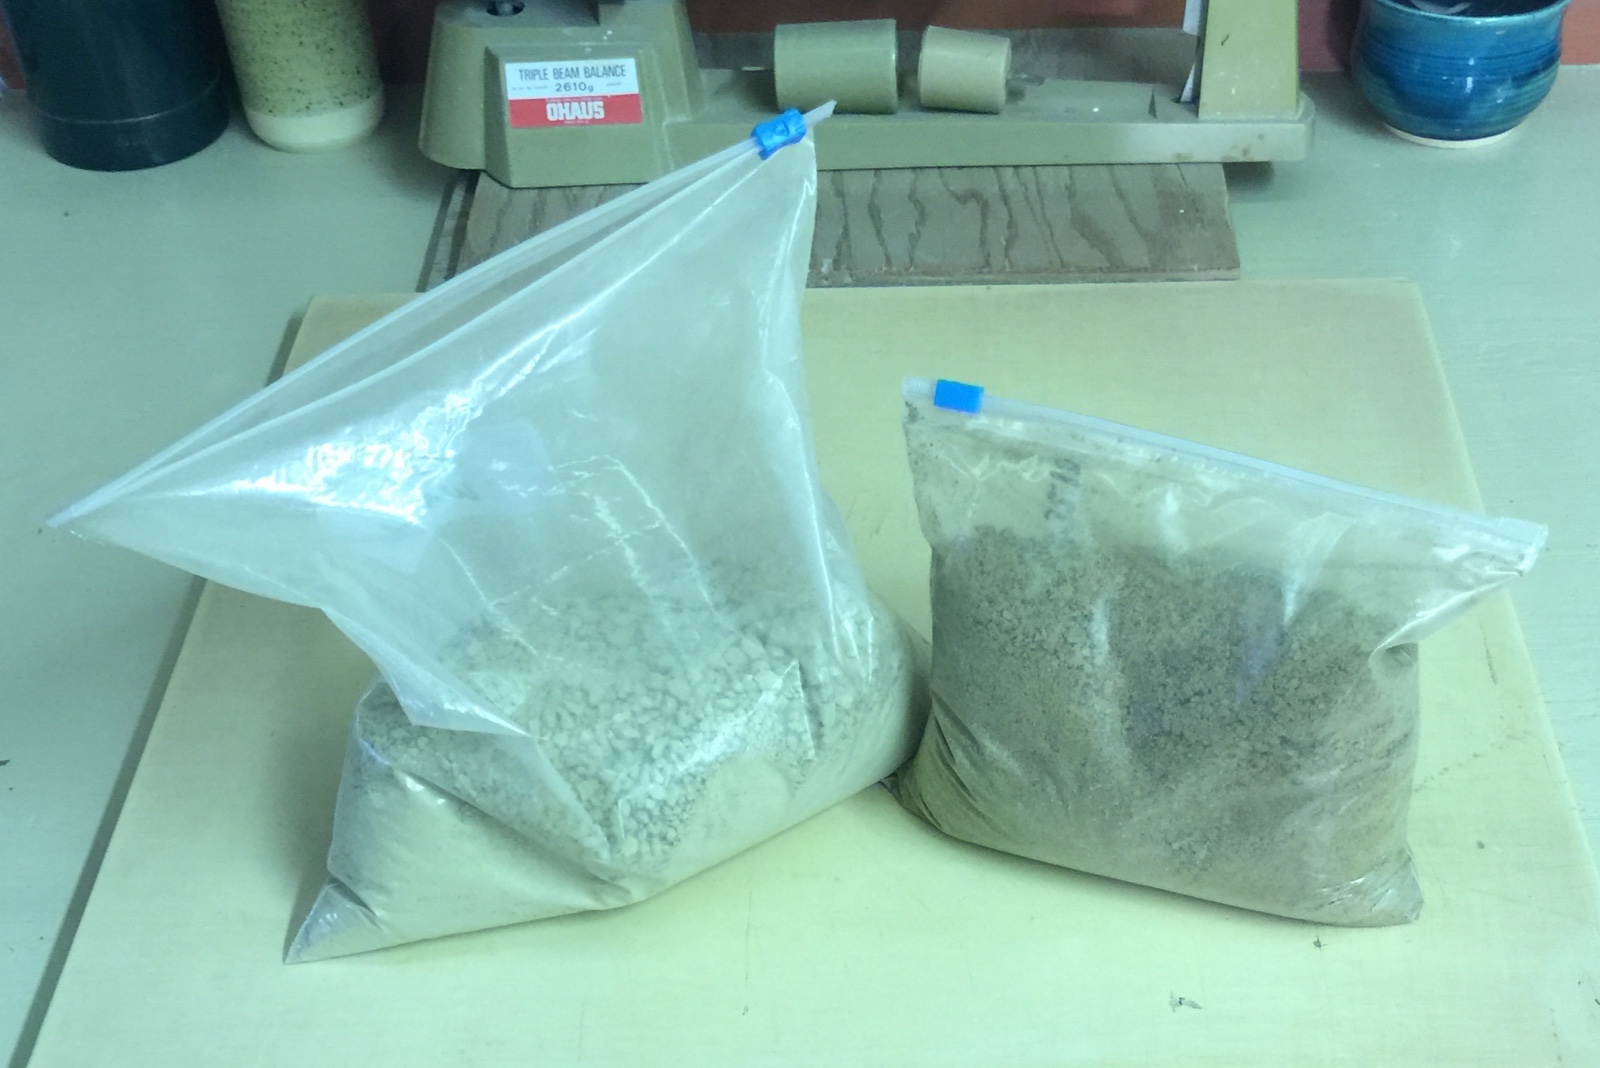
An important question you need to ask is: How wet is the powder? The more water it contains the more expensive it will be to remove that water for any dry grinding or screen process that needs to be done. Even for wet processes, dry clay slakes better. They have sent a bag of the wet material so I can measure its water content.
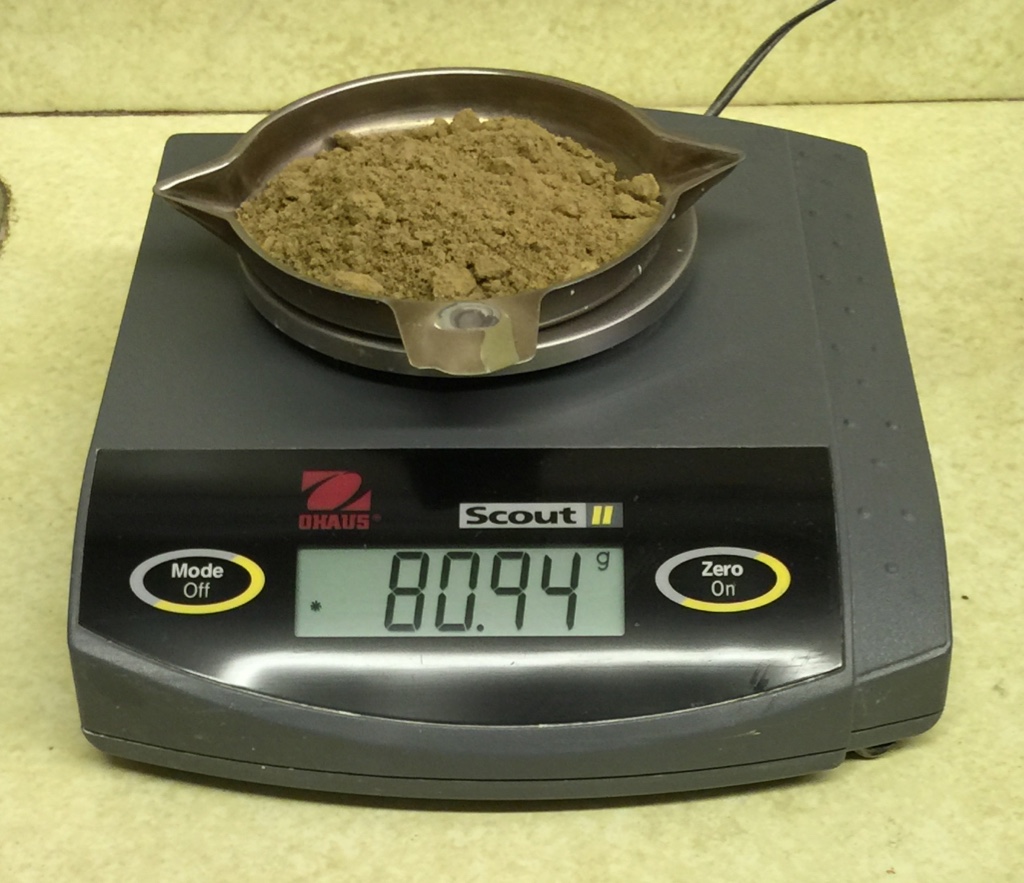
First I need to weigh a specimen of the powder, dry it, then weigh it again.
Now, I need to enter the two weights into the recipe in Insight-live.
I need to click the little Edit button beside the "Testdata" heading. That will open the test data entry page.
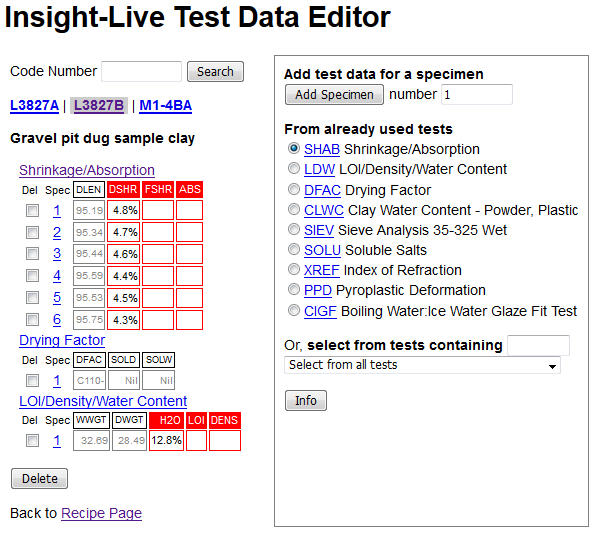
This is where I will be entering all of the measured values (below). On the top left recipe L3827B is highlighted and titled. Notice that next and previous ones are shown (so I am one click away from entering data for them). I can also search codes from here to find any other for which I have data to enter. On the right I can choose a test for which to enter data. This will look different for you because I have already used it many times so it gives me some quick-pick radio buttons for my most frequently used tests (you will have to pick the test from the list box at the bottom to built up your quick picks). The list orders them according to their four-letter abbreviation code.
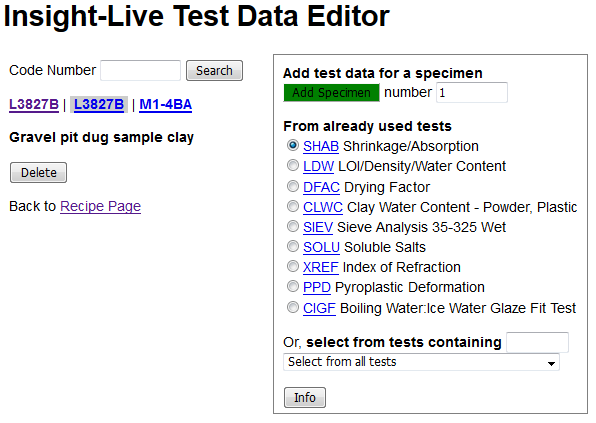
I will check the LDW radio button and click the green Add Specimen button (the default specimen number of 1 is OK).
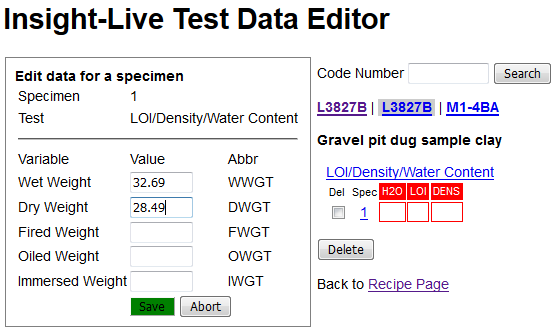
Now the page has created a data entry form on the left for that recipe, that test and that specimen. I have filled in the wet and dry weights of the powder and will now click the Save button.

It now shows me the two data points it knows and has calculated what it can from them: the %H2O. Notice that it can also calculate the LOI and Density (I will be giving it the fired weight of the specimen later so it can calculate the LOI).
Now I already know something valuable about this material. It has a high water content. But most forms of processing require low moisture content in the powder. The cost of achieving that low water content can be greatly reduced if the material can be sun dried. Ideally the best way to do this is to stock pile the clay and allow it to dry out over a period of years. During that time lumps break down and soluble salts come to the surface. This works well for plastic clays since they have a low permeability to the passage of water and can shed rain (which takes away solubles also). But if this material is non plastic or sandy the rain will keep the pile wet in most climates.
Measuring the PSD
I need to know how fine the material is. This is one of the most important properties since it is an indicator of how expensive it will be to process. Actually, I need to know more than just the particle size, I need to know the distribution of sizes. How much plus 35 mesh is there? Plus 70 mesh? Plus 100 mesh? etc.
This test will also reveal the level of impurities. I will be able to see them on the top couple of screens, not just the amount but the type of material. For example, I will be able to see if there is plant material, lignite particles, small stones, sand, etc.

I measure this property using a set of interlocking brass sieves that get finer and finer going downward. I wash 100 grams of powder through the pile, dry the screens, then weigh how much catches on each one. This is called a root-of-two series of sieves because as we move downward through the pile the area of the square openings between the wires halves (and therefore the length of one side of the square by the root of two). These are called "Tyler Sieves", they are expensive but you can often find them on ebay.com. I use this series: #35, #48, #70, #100, #150.
The first step is to weigh out the 100 grams and then vigorously break it down using a power mixer.
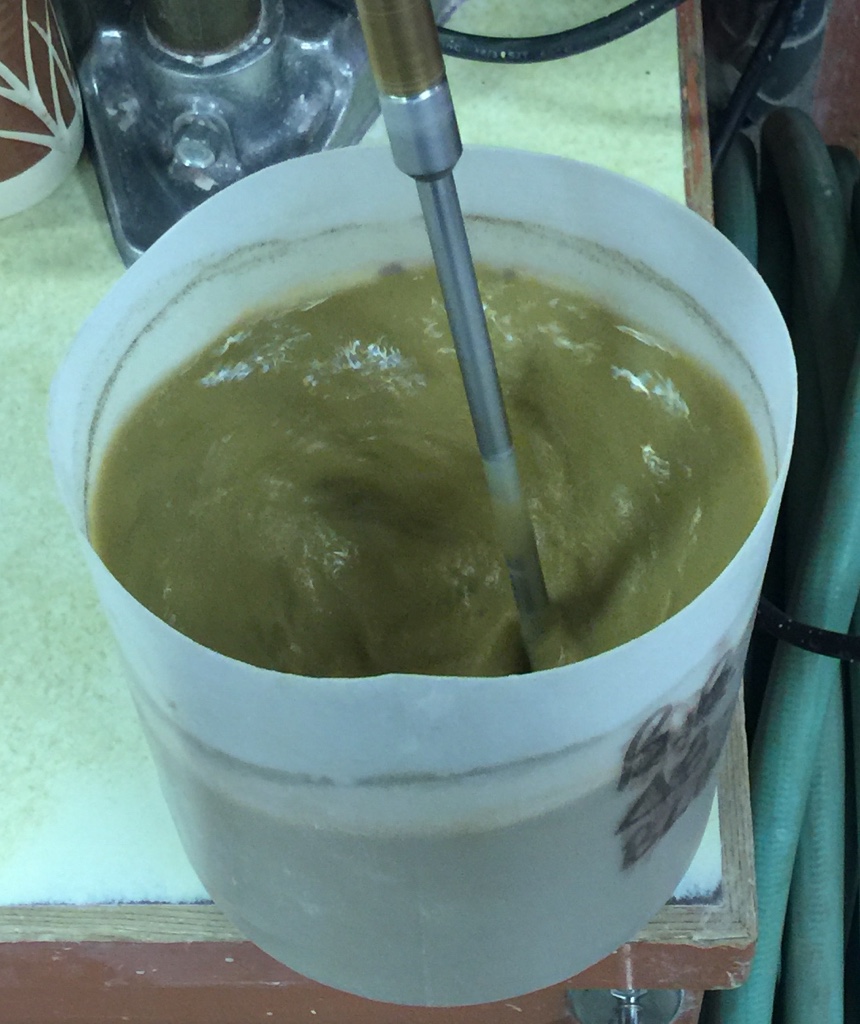
The mixer obviously cannot grind any particles finer, but it can break up agglomerates and wet the surfaces of even the finest particles. I am interested to know the sizes of the ultimate particles, not the sizes of the chunks into which clay particles naturally agglomerate to form during drying. Another thing to note here is the colour: green. This is characteristic of an iron-bearing clay that fires red. We will see.
Next I pour the thin slurry through the finest of the sieves (in this case 140 mesh).
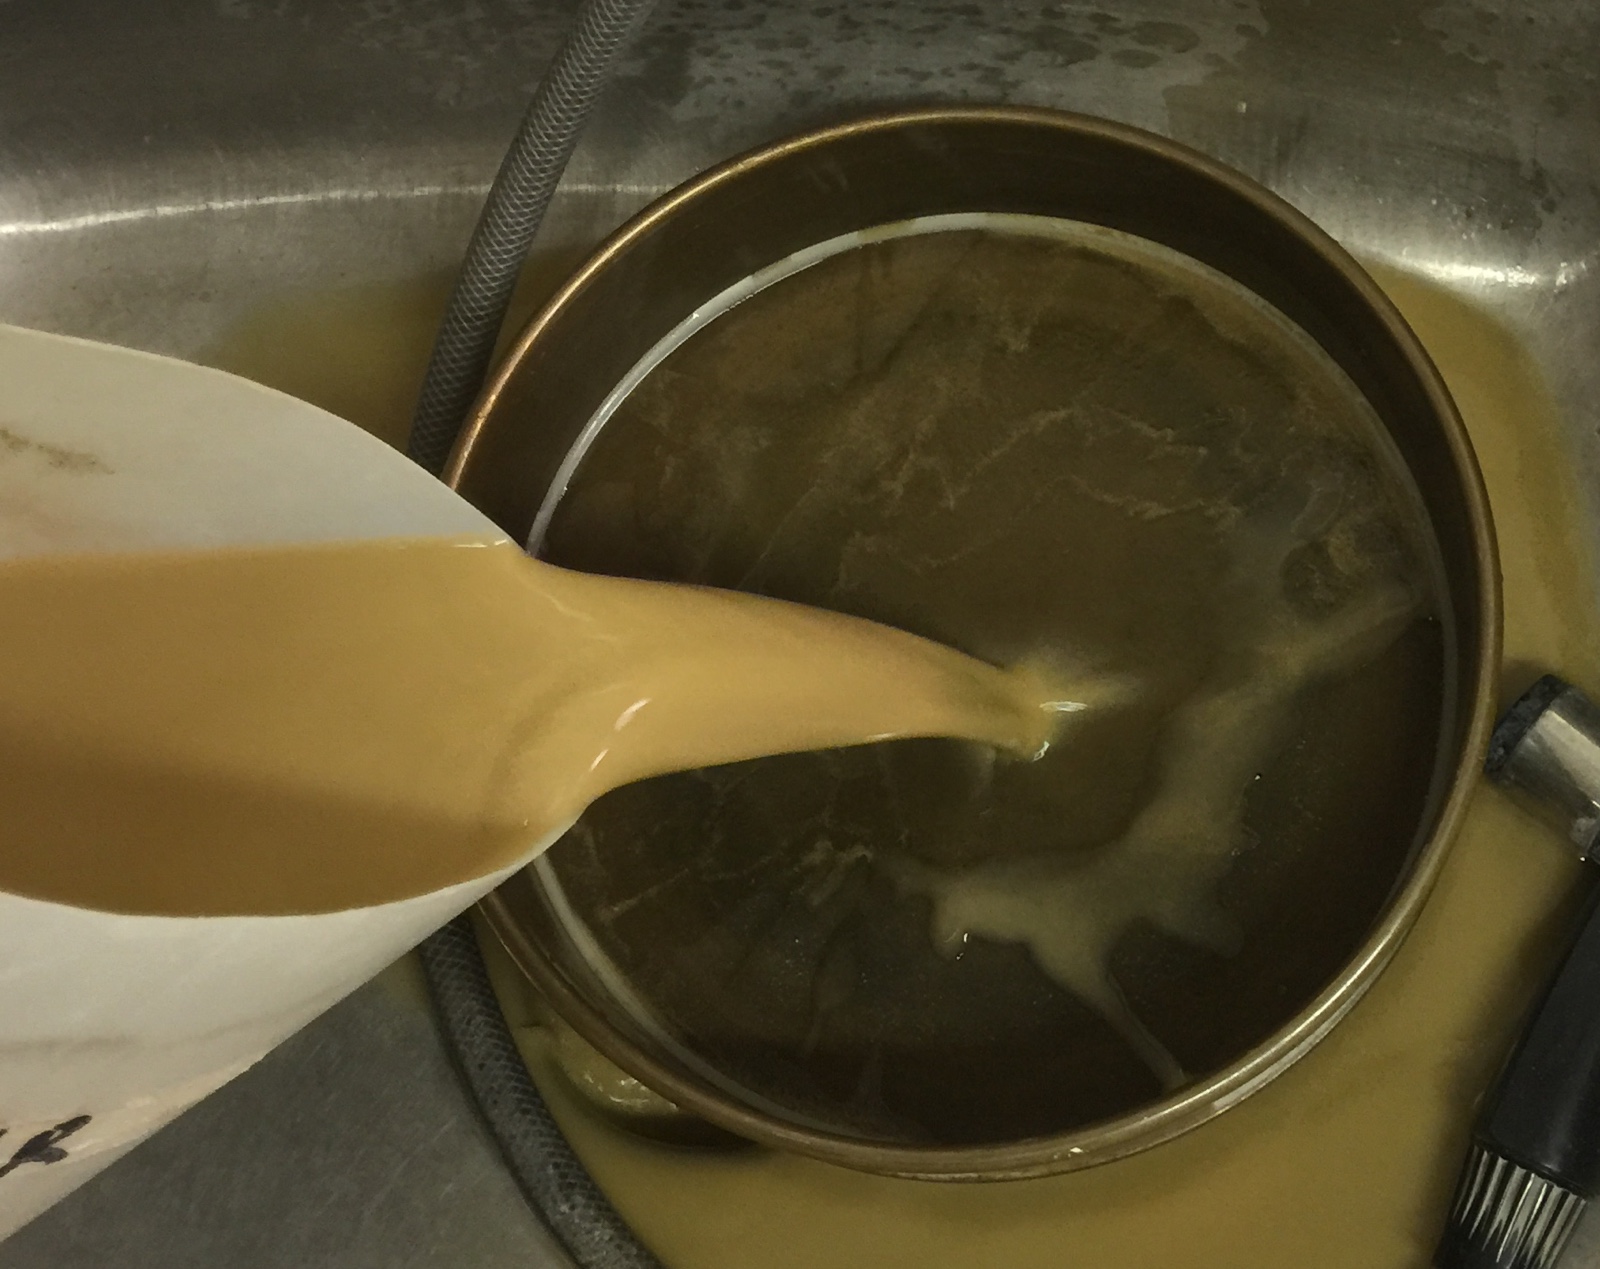
As you can see 95% or more is just pouring right through. This is obviously a very fine particled clay. When there are no impurities like this we can be sure the clay is sedimentary rather than primary. This is looking very good! Next I use a sprayer, which you can see in the picture, to coax as much of the material through the screen as will go. Then I reverse-wash the oversize back into a plastic container, pile the screens up in the sink and wash the small amount of material down through them all.
Then I take each screen off the top of the pile, spraying water on the next to wash as much of the oversize through it as possible. Then the next and the next until they are all done.
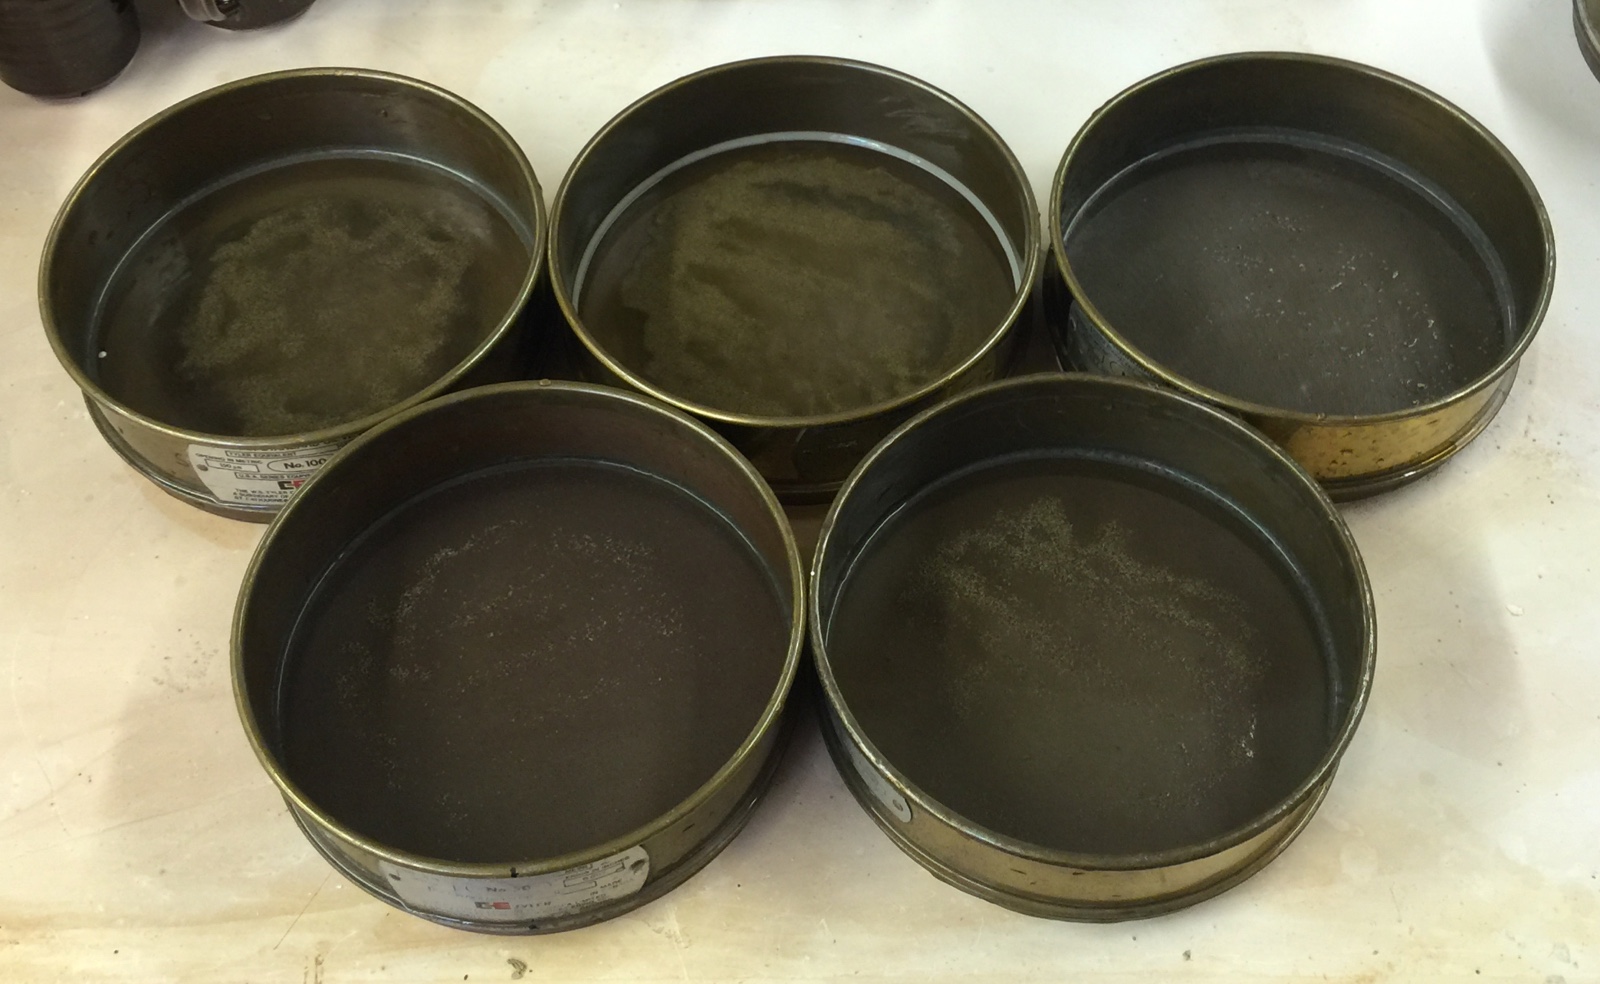
Then I set them out to dry for weighing the next day.
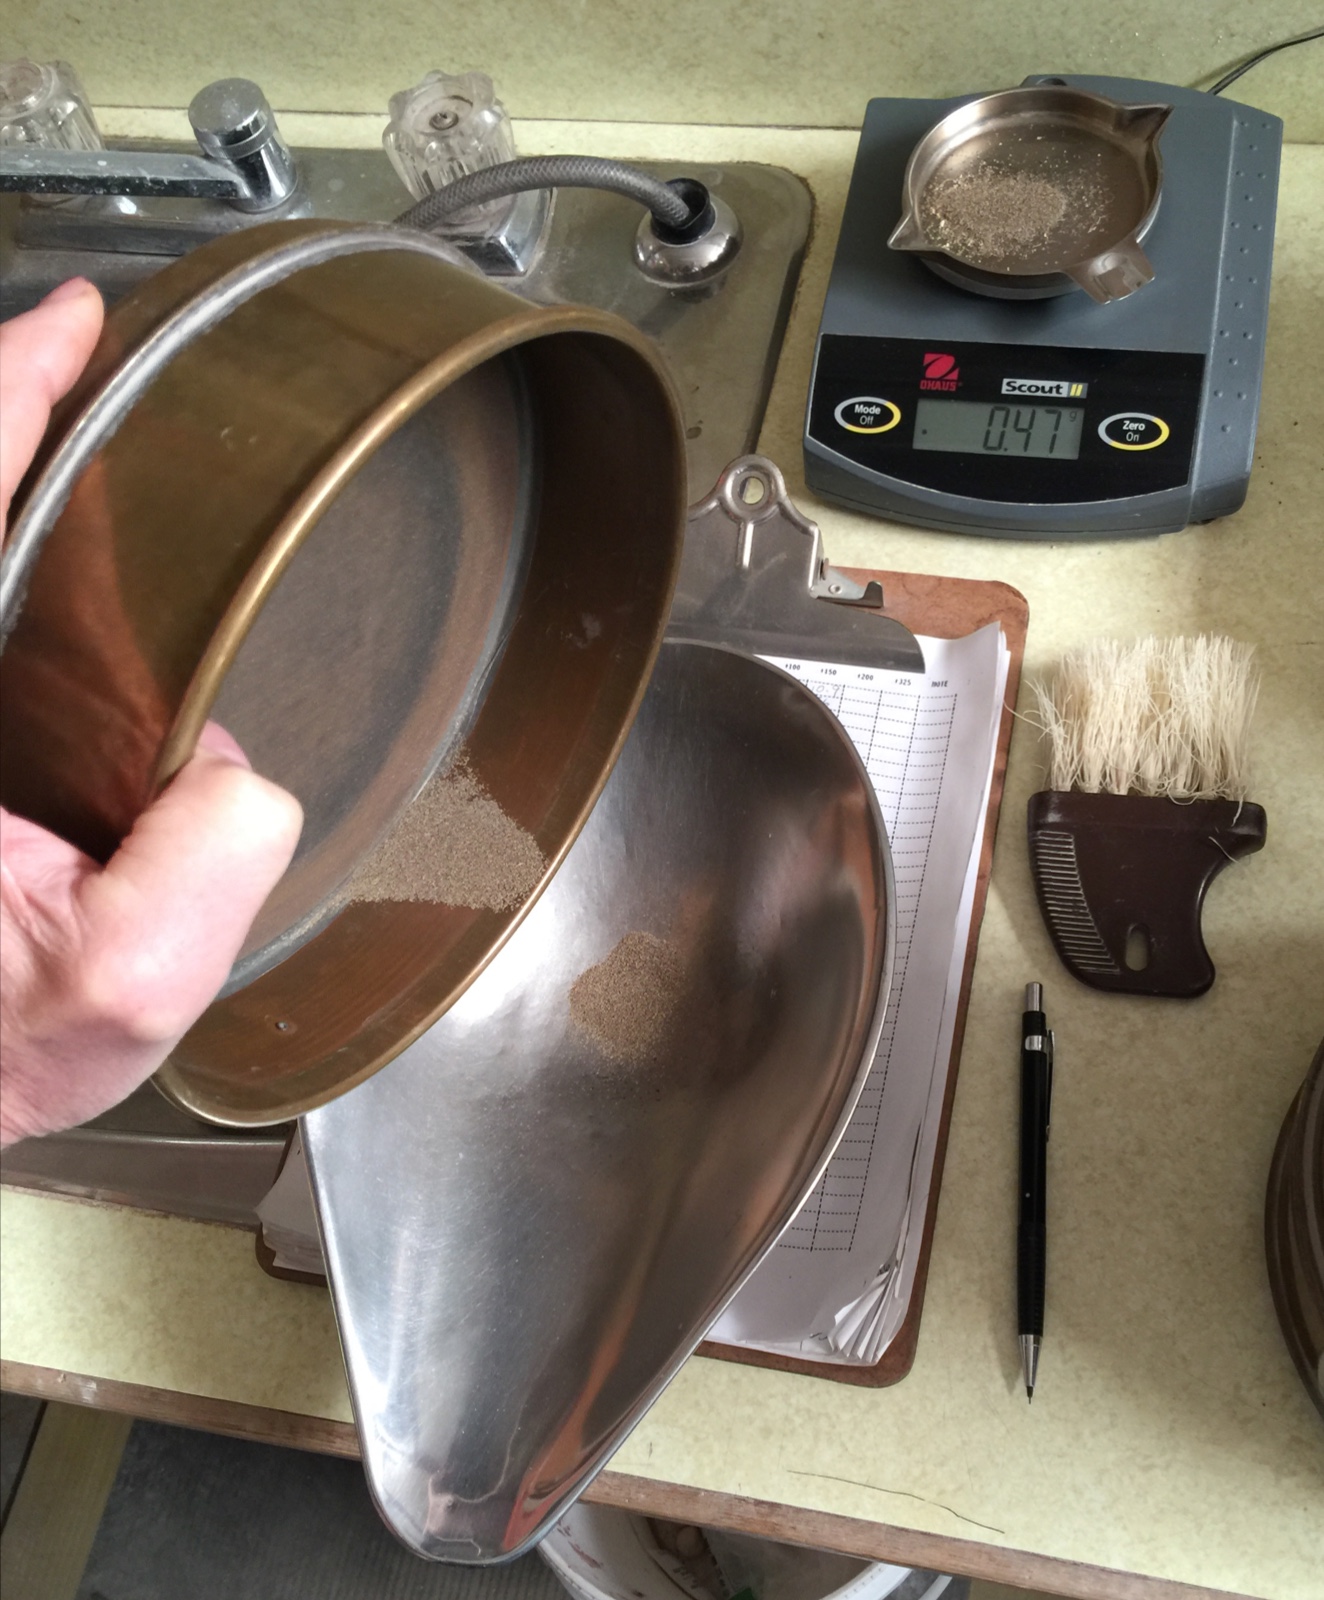
To weigh the amount of oversize on each screen I just brush it down to the edge and pour it into the pan. I use a log sheet to record the weight on each.
Next I need to enter the numbers into the record in my Insight-live.com account. I open the Test Data editor (the way I did for the water content of the powder), select the SIEV test, enter a specimen of 1 and click the green Add Specimen button.

Then I just need to type in the numbers and click the Save button. Notice that I am not using a 200 or 325 mesh screen because they are kind of overkill for this.

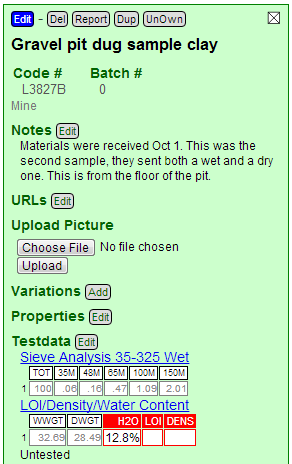
After saving Insight-live redisplays the recipe panel and has filled in the grid for the Sieve Analysis test. Notice there are no red boxes as for the LDW test because it is not calculating anything from the data.
Notice those numbers. Only at 2.5% is plus 140 mesh and about 1.5% is plus 100 mesh. This is very good for a completely unprocessed clay.
Adding a picture of PSD particles
The amount of material on the screens in the PSD test is only part of the story. The other part is what the particles are. Ordinary cell phones now have cameras good enough to take amazing close-up photos. We can take advantage of that. Using an iPhone set on top of a 3 inch kiln post and the timer I got this great photo. With my $15 closeup lens I can do even better.

I took the photo using the Photogene app and then cropped it, resampled to a lower resolution and then upload it to the recipe in my Insight-live account. You can see how I do that in this video.
Click here to watch this at youtube.com or click here to go to our Youtube channel
Take a closer look at those particles above (the image is fairly high resolution so you can zoom on your phone or tablet). The larger particles on the far left are mostly just agglomerates of the clay itself, having the same color. But as we proceed rightward toward the finer ones, increasing numbers of quartz particles appear. These are mixed with red and black ones. The red ones are not a big concern since this clay is likely to burn red anyway. But the black ones should be identified by firing and re-examining (if they are lignite they will burn away).
If I was more sure that this would be a high temperature material, especially white burning, I would spread these particles on a tile and fire them. The black lignite particles would just burn away but the iron-bearing ones would melt and blossom.
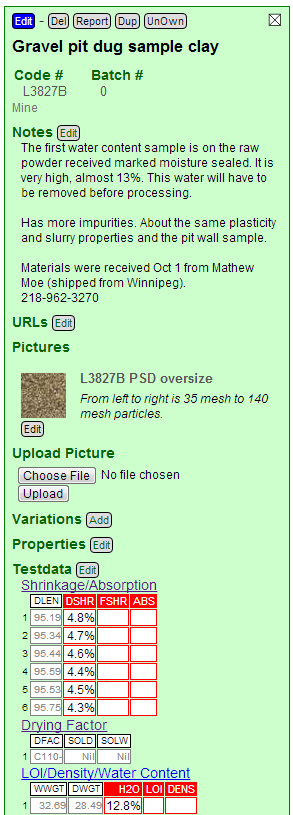
Here is how the recipe looks in Insight-live now. I have already clicked the Edit button underneath the picture icon and entered a title and note.
Slurrying and dewatering
Now I need to prepare a plastic sample of the material for making various test specimens. The first step is to sprinkle it into water and allow it to sit and slake. This disintegration that happens in water is called "slaking". During the process the water is penetrating between the particles giving them the mobility to float away as individuals or in an agglomerate with others (usually settling immediately). However clouds of extremely fine particles often form, these can settle much more slowly. Highly plastic clays can have particles that are incredibly small, these take much longer to slake. In some cases, such as with bentonite, the clay swells as it slakes, forming a film that prevents water from penetrating inward.
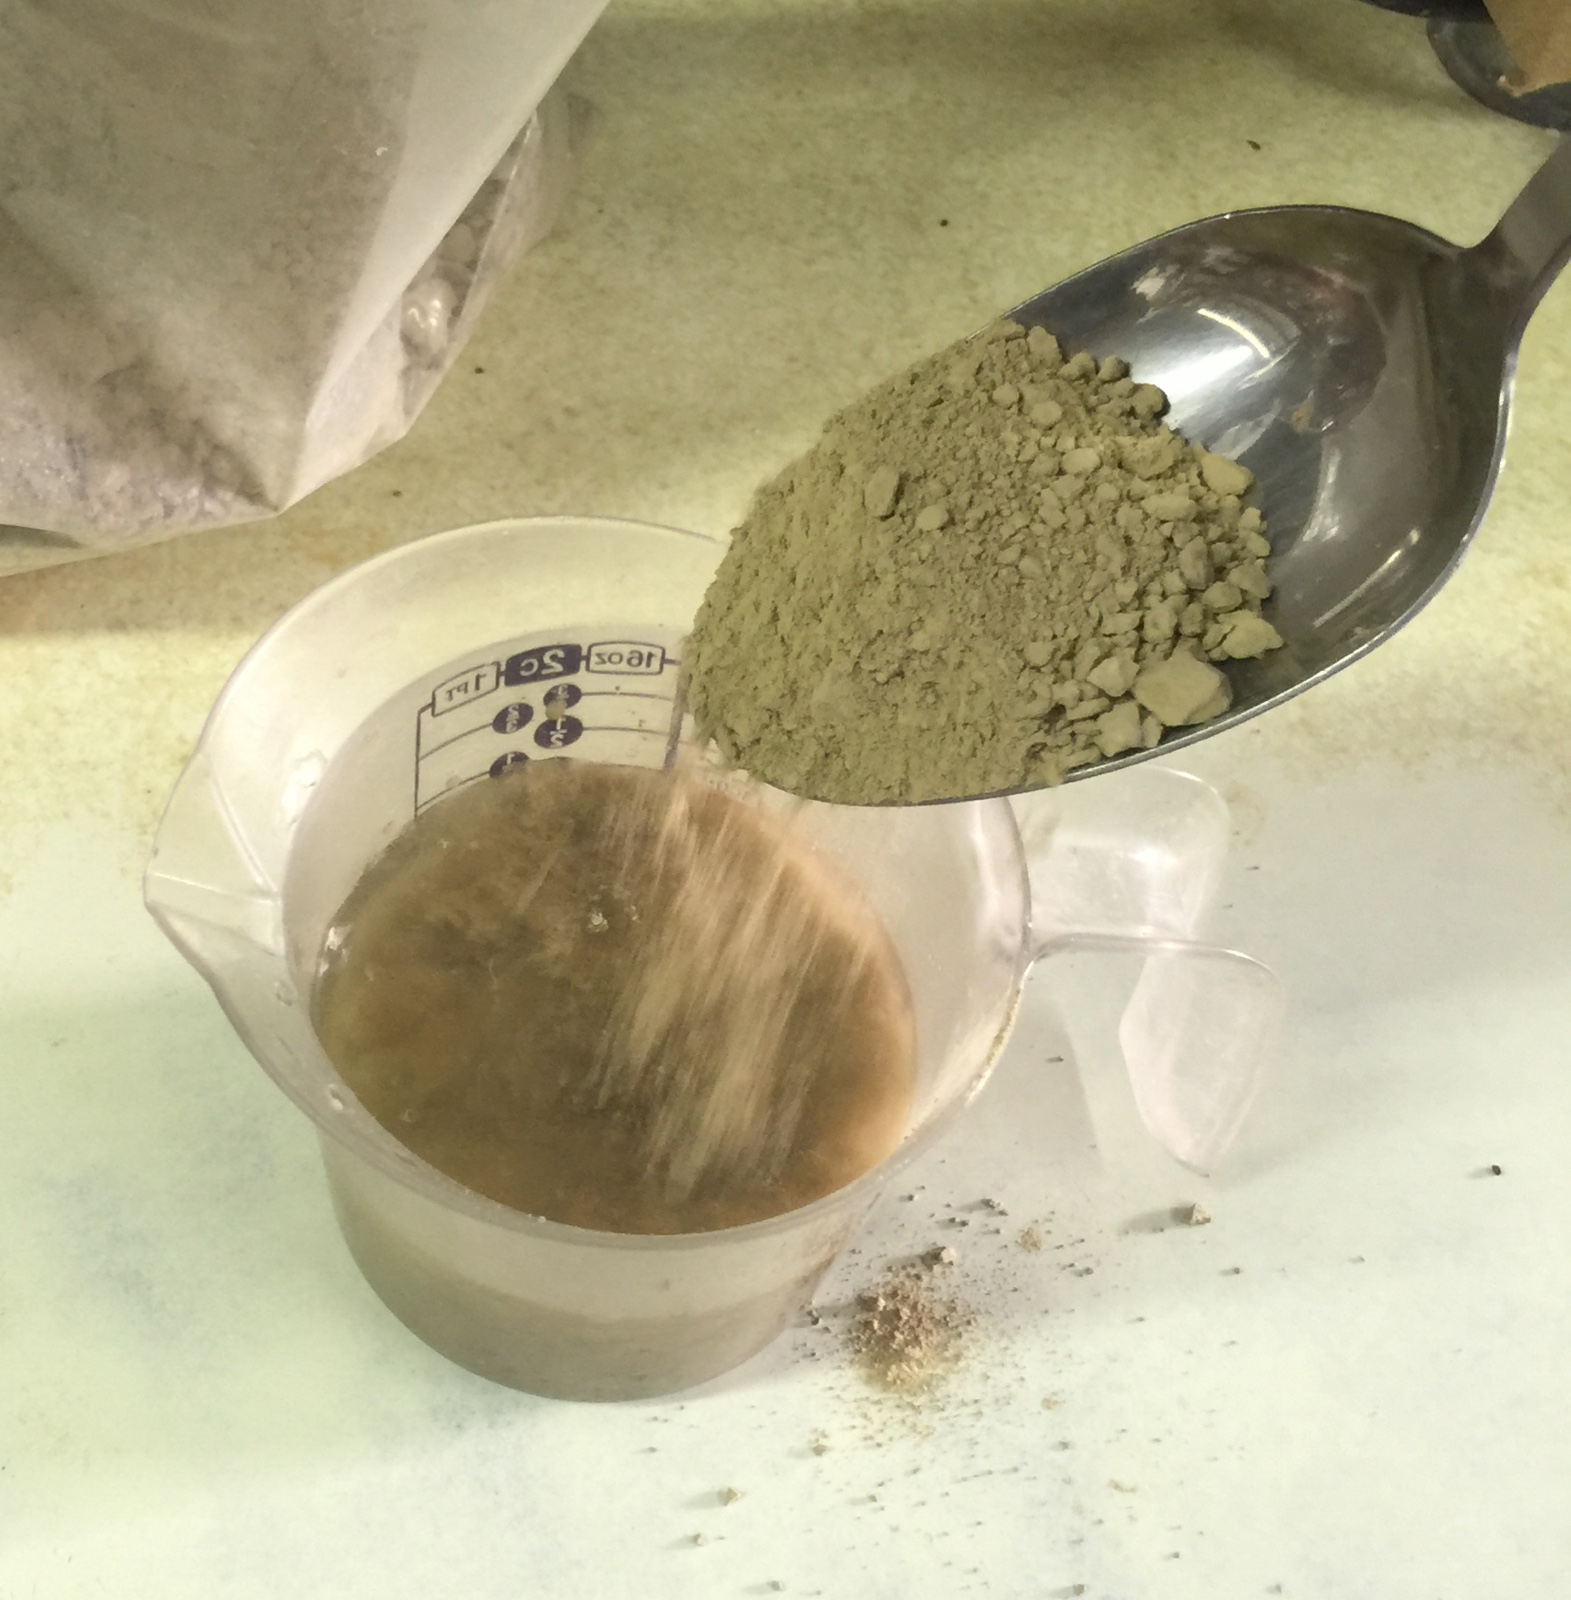
This material breaks down very quickly in the water. That means that although it appears very fine mechanically (because it washed through all the sieves so readily), from an ultimate particle size perspective, it is likely quite coarse. The small size of the lumps in also an indicator of this (finer ultimate particle clays tend to be in larger lumps).
I was able to stir up quickly so I could pour it into the blender. But there is something else to notice here. The color: Green. Very green. I have seen many clays like this before. They normally fire quite red in color and mature at a low temperature like a terra cotta.
I could have simply added the water and powder into the blender, but that can get very messy if the clay being tested is highly plastic (even the power of the blender is not enough to dislodge it from the nooks and crannies making for a difficult clean up). By allowing it to slake and pre-stir I can also fine tune the amount of water.
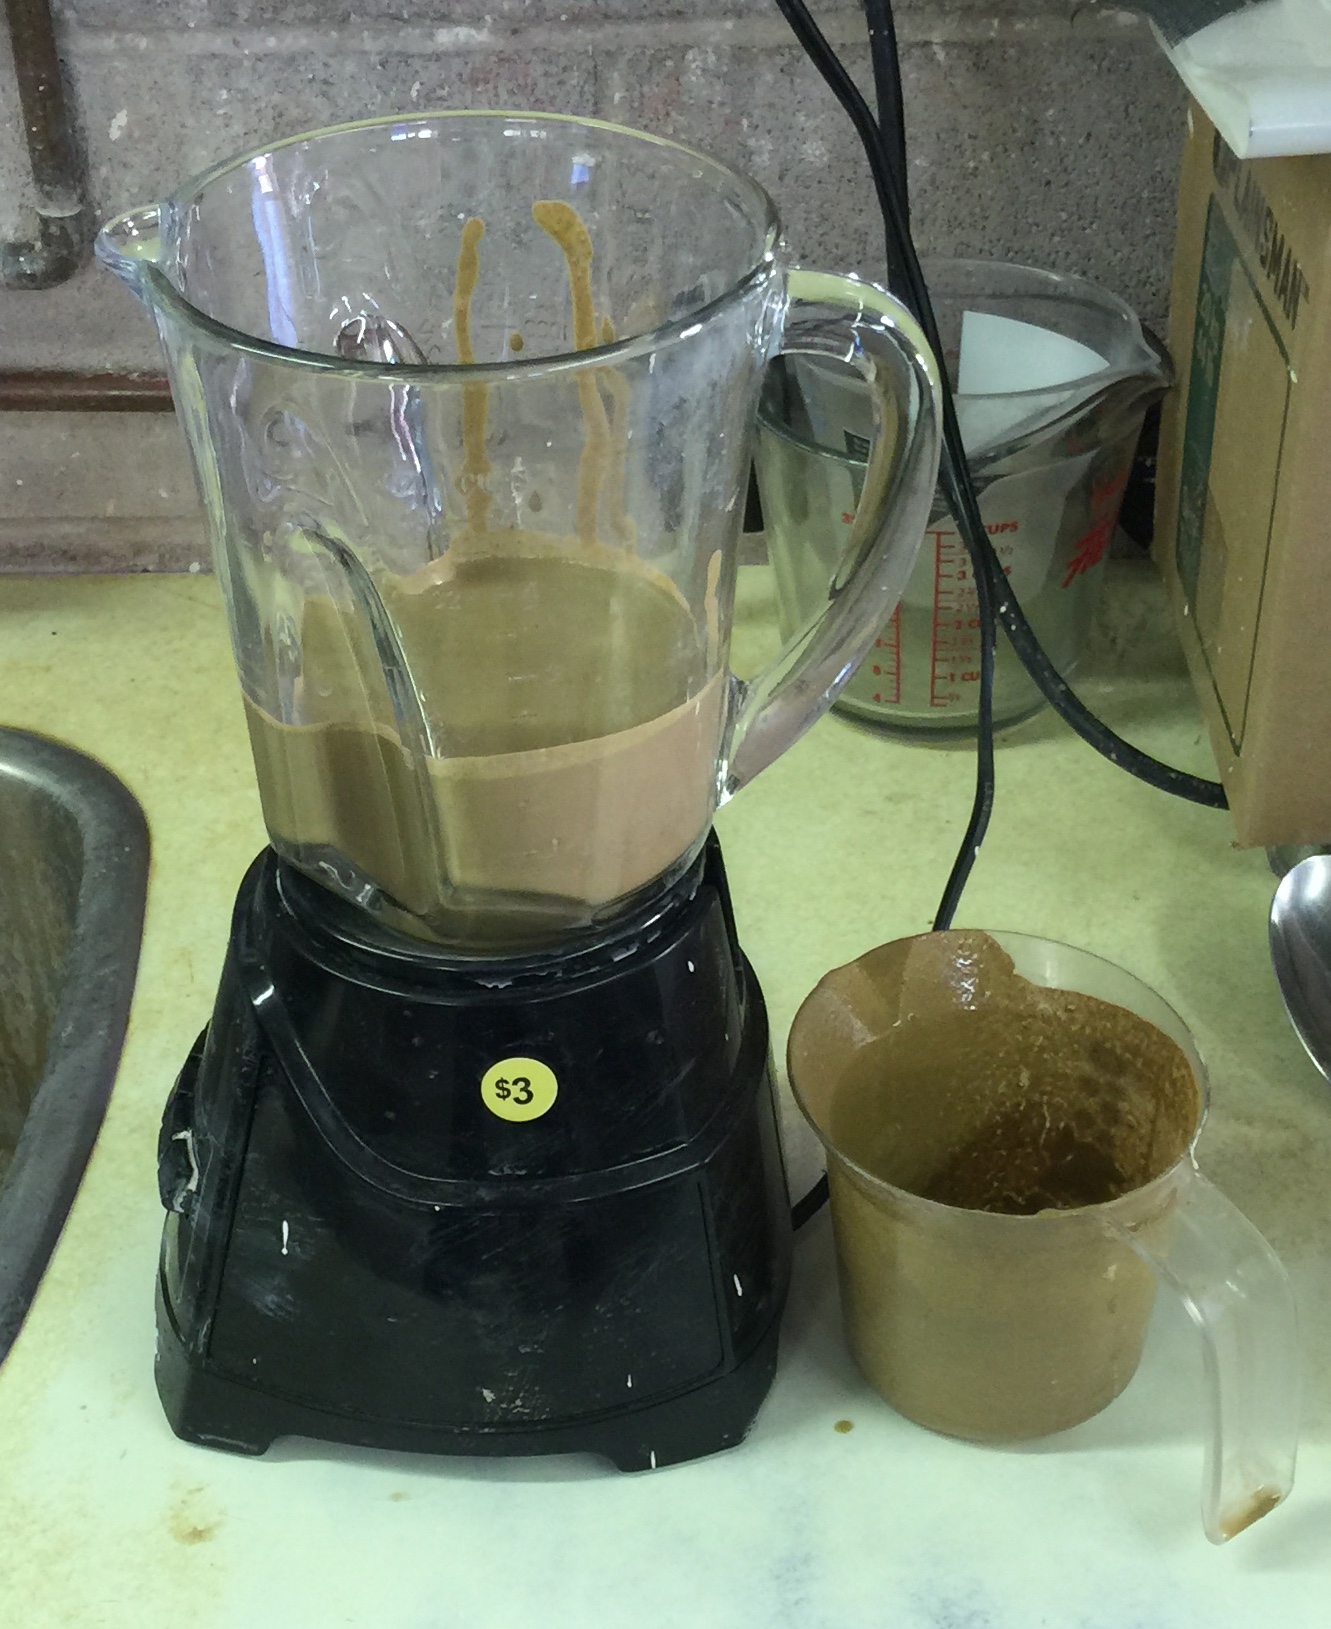
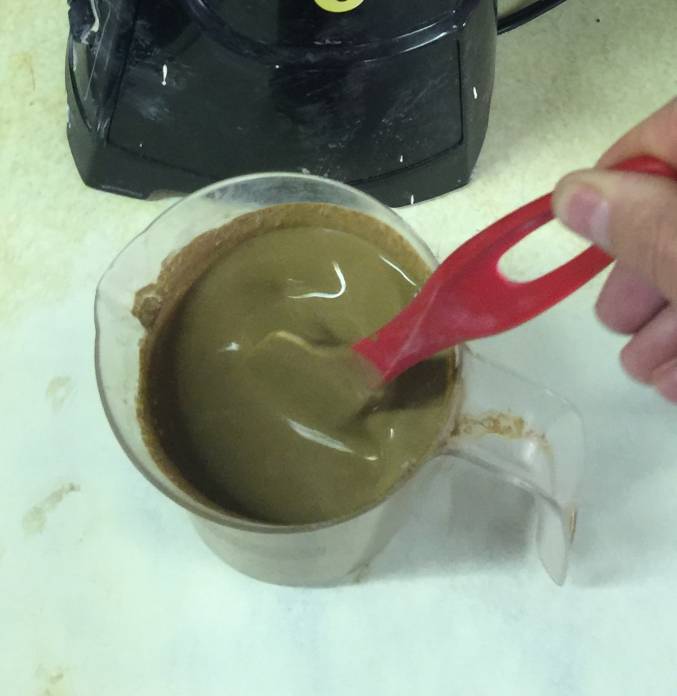
Now it is in the blender ready for some serious mixing!
The blender thickened the slurry quite a bit and mixed in lots of air bubbles (but they are not a problem here). It feels very smooth.
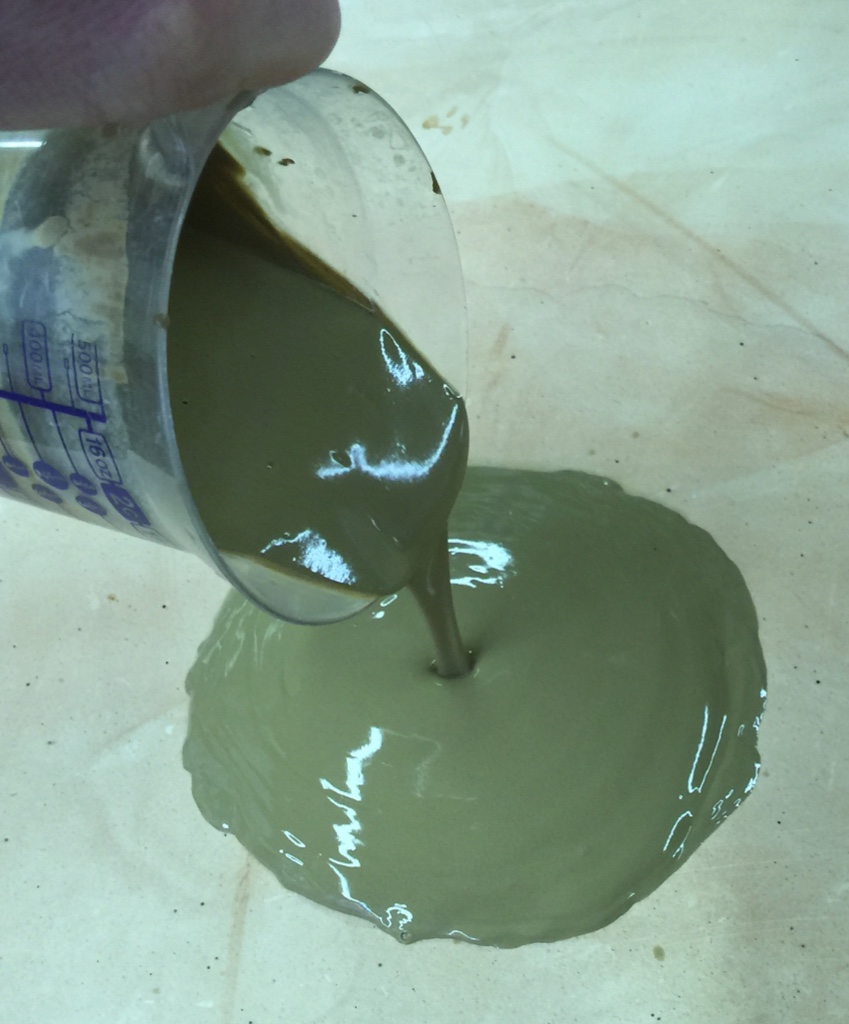
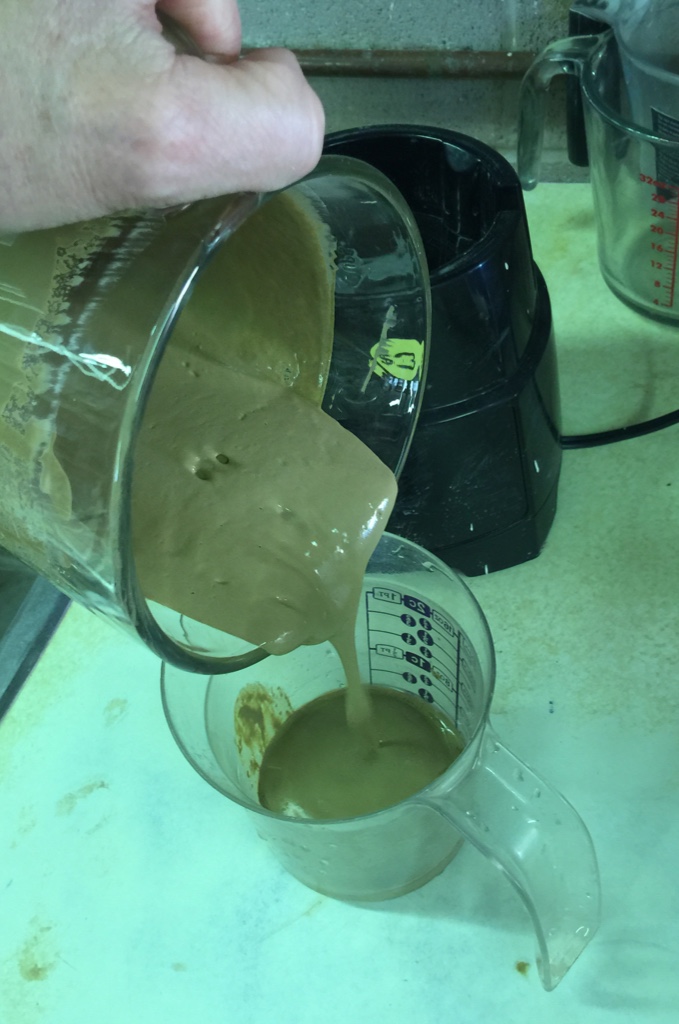
Now I just need to pour it out on a plaster slab to let it dewater.
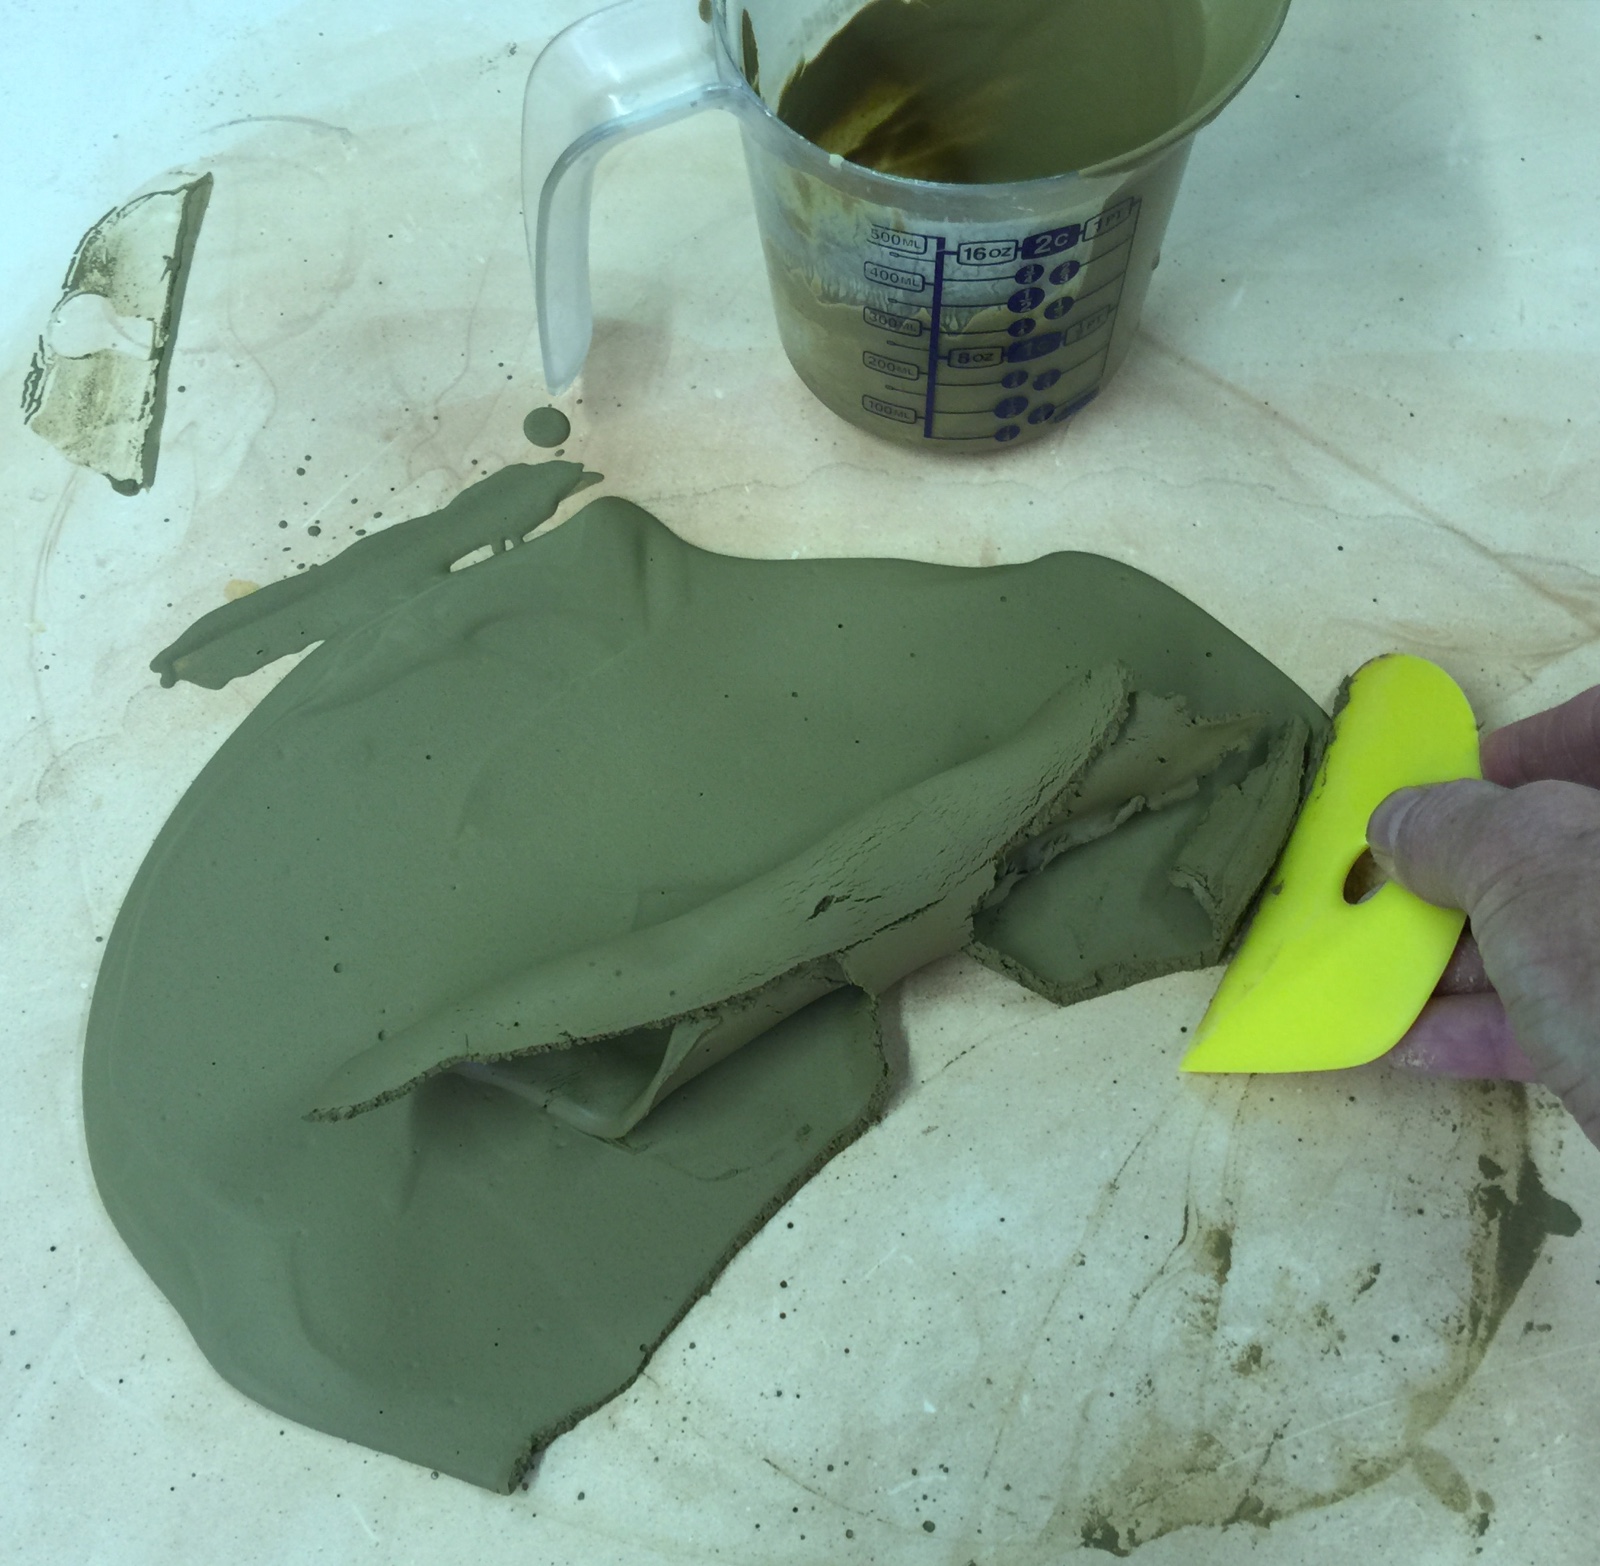
The behavior during dewatering is a good indicator of the fine clay particle content. If this was a bentonite or ball clay, it could take days before the water is pulled out enough to be able to knead the clay. A kaolin, on the other hand, can dewater in a minute and quickly get too hard to knead. So it is important to watch during the first minute or two to see what is happening. This material dewatered slower than a kaolin but much faster than a ball clay or bentonite (about 5 minutes). At the same time it did not release from the plaster the way I would normally expect, I had to peel it up with a rubber rib. This suggests that it has very fine particles, they are able to penetrate into the irregularities in the plaster surface and hang on. These observations are worth noting in the notes box in Insight-live.
Next I kneaded it and laid it back down on the plaster for a few minutes to stiffen it a little more (often it is necessary to repeat this a few times to get it stiff enough). Now I have the clay in a plastic form ready to make test specimens.
Preparing test specimens
The first step is the wedge (knead) the clay. To make the test bars I only need a handful, about 2 lbs. When wedging I am watching if it splits at the edge of the spiral (this one is doing that a little). Splitting indicates lower plasticity. Of course, if it is really plastic it will be sticky and sticking to the wedging board also.
From this piece of clay I am going to make test bars from which I will be able to measur the drying shrinkage, water content, drying performance, fired shrinkage and porosity at a range of temperatures, the loss on ignition and the dry strength.

Next I roll about 1 lb of it out into a flat slab 3/8" thick and about 5" wide (I manually stretch the slab by hand until it is near the desired thickness, then finish with the rolling pin). I use 3/8 metal rods as thickness guides. Here again I am watching for how it splits on the edges as I roll it out. This clay is splitting a little, it is not high in plasticity.

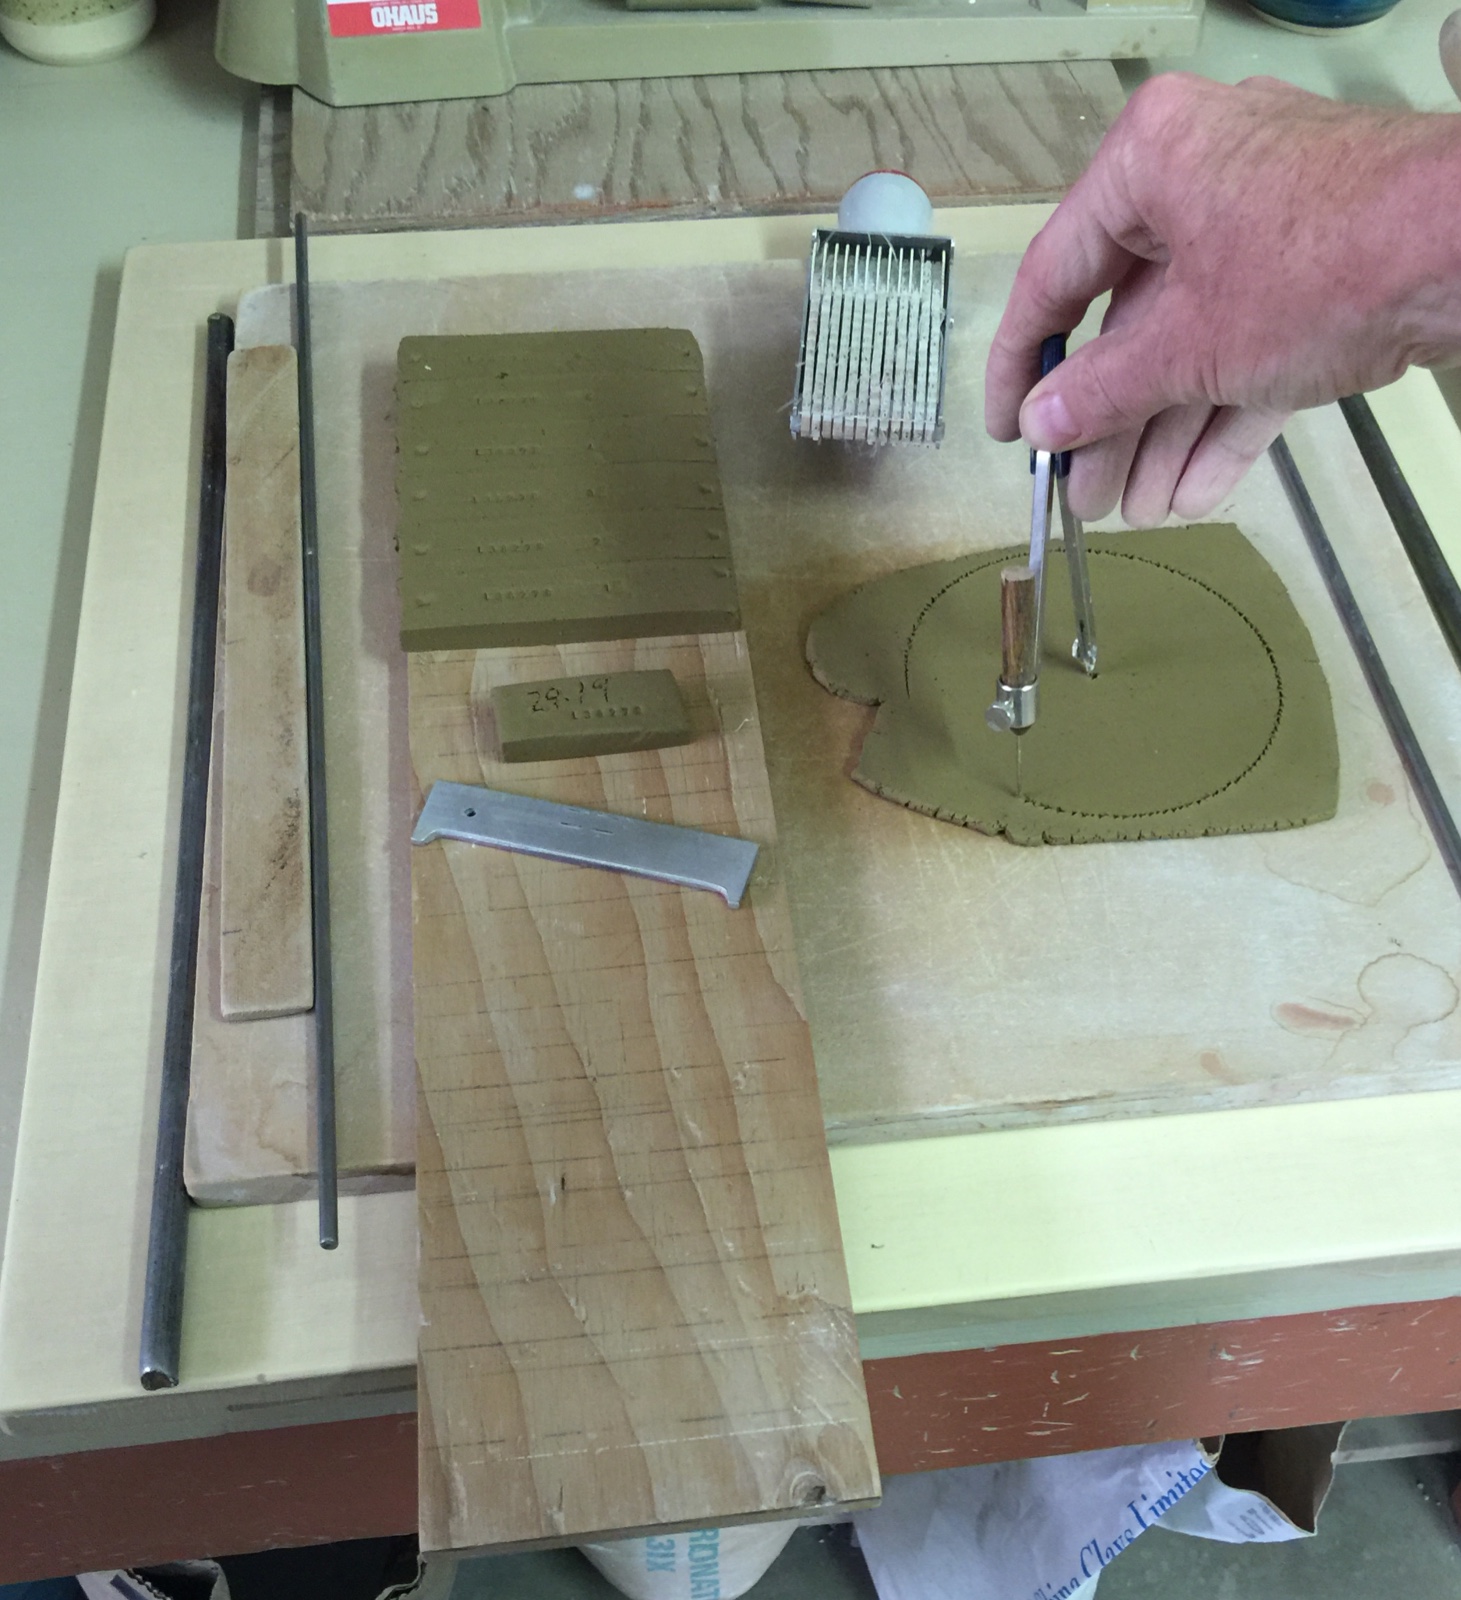
Then I lay the slab onto a 11cm wide board and cut it to that width. Then I use a wooden width gauge to cut 2cm wide bars (in this case I am firing six temperatures). I stamp the run number onto each along with a specimen number (in this case 1 to 6) and 10cm measuring marks (using an aluminum guage I made). I make a half size bar, stamp it, weigh it and write the weight on it. Then I roll a 3/16 slab big enough to cut a 12cm diameter disk and stamp that with the run number and lay it on the board also.
Now I am ready to dry the test specimens.
Drying the test specimens
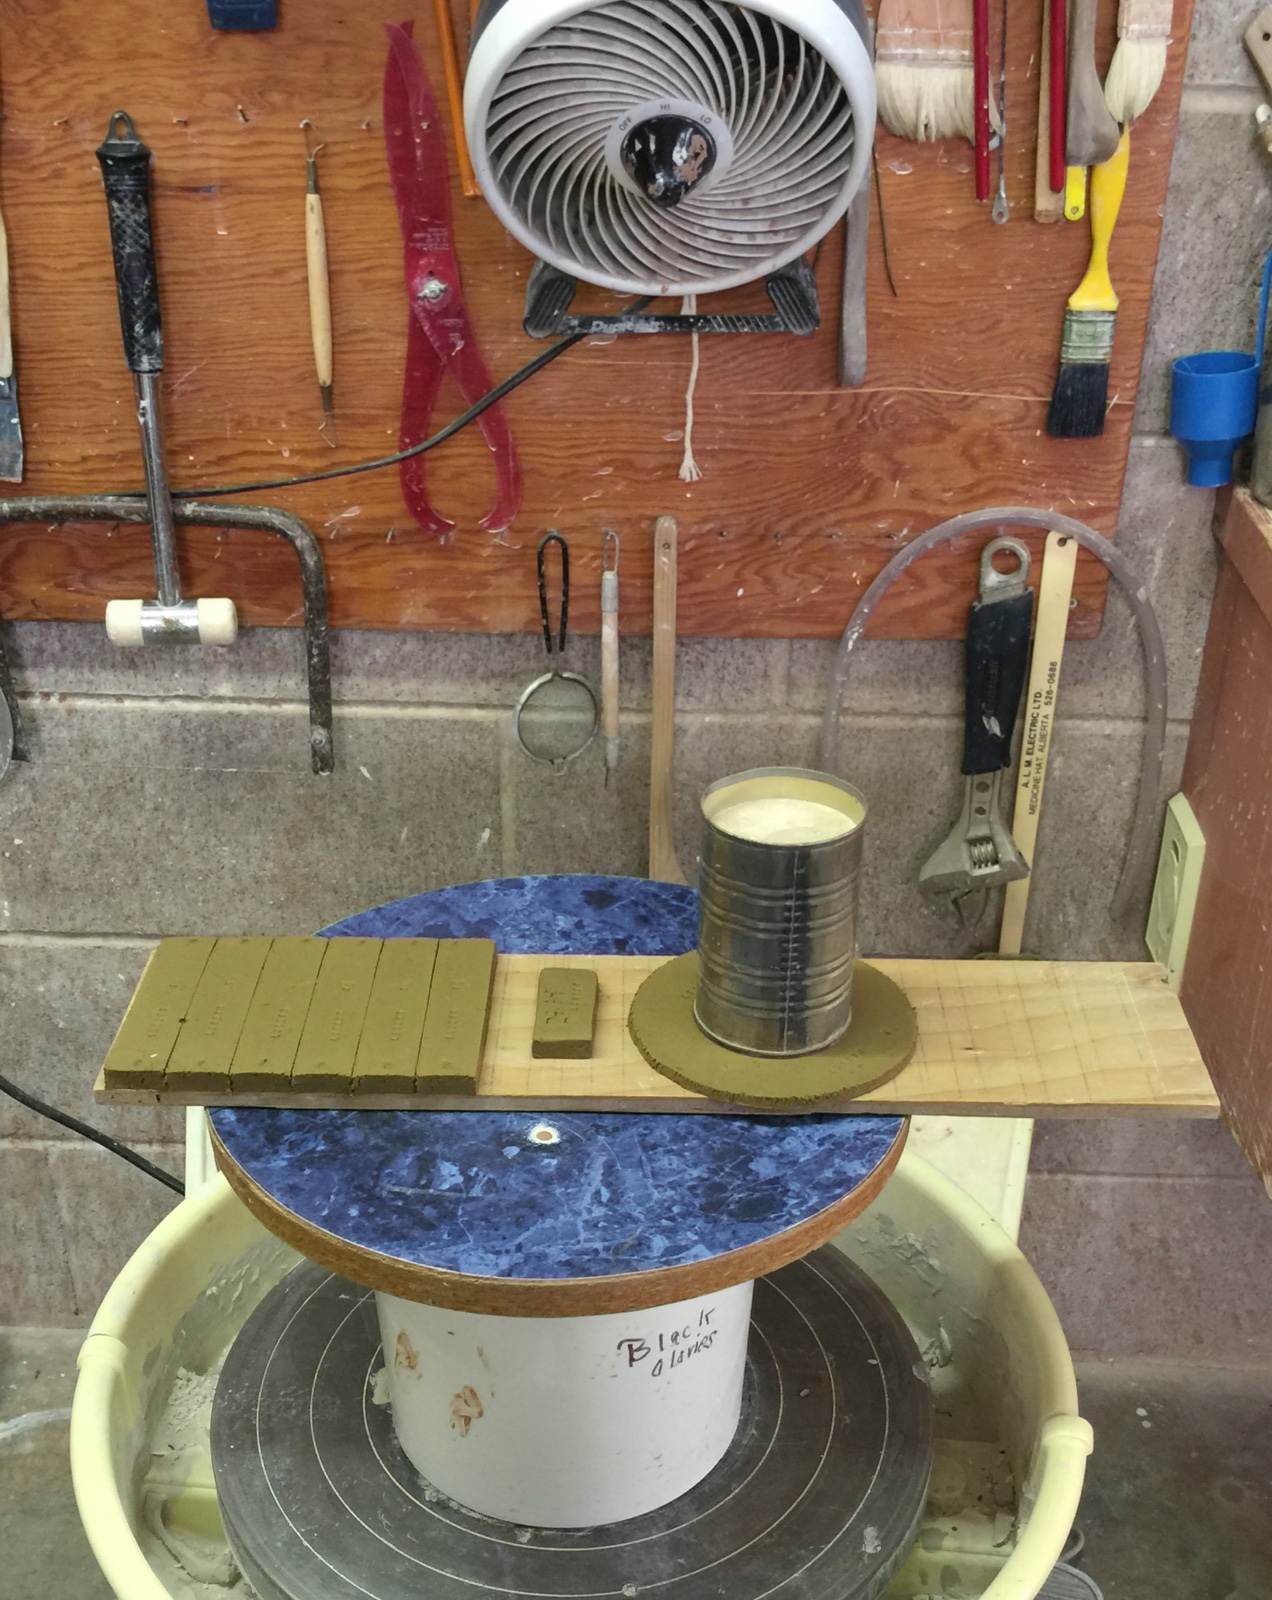
I have put a soup-tin (full of plaster to give it weight) on the disk. While the bars can dry over night, the rate of drying of the disk needs to be accelerated to make it dry and shrink around the outer edge first. I have a drier but lately have found that this simple method works when I am doing only a couple of sets of bars. I turn on the potters wheel to rotate slowly. The fan is attached to my tool board. Although it is not desirable for the bars to curl up, I find that for most clays they do stay straight. For the highly plastic ones I turn them over from time to time as drying proceeds.
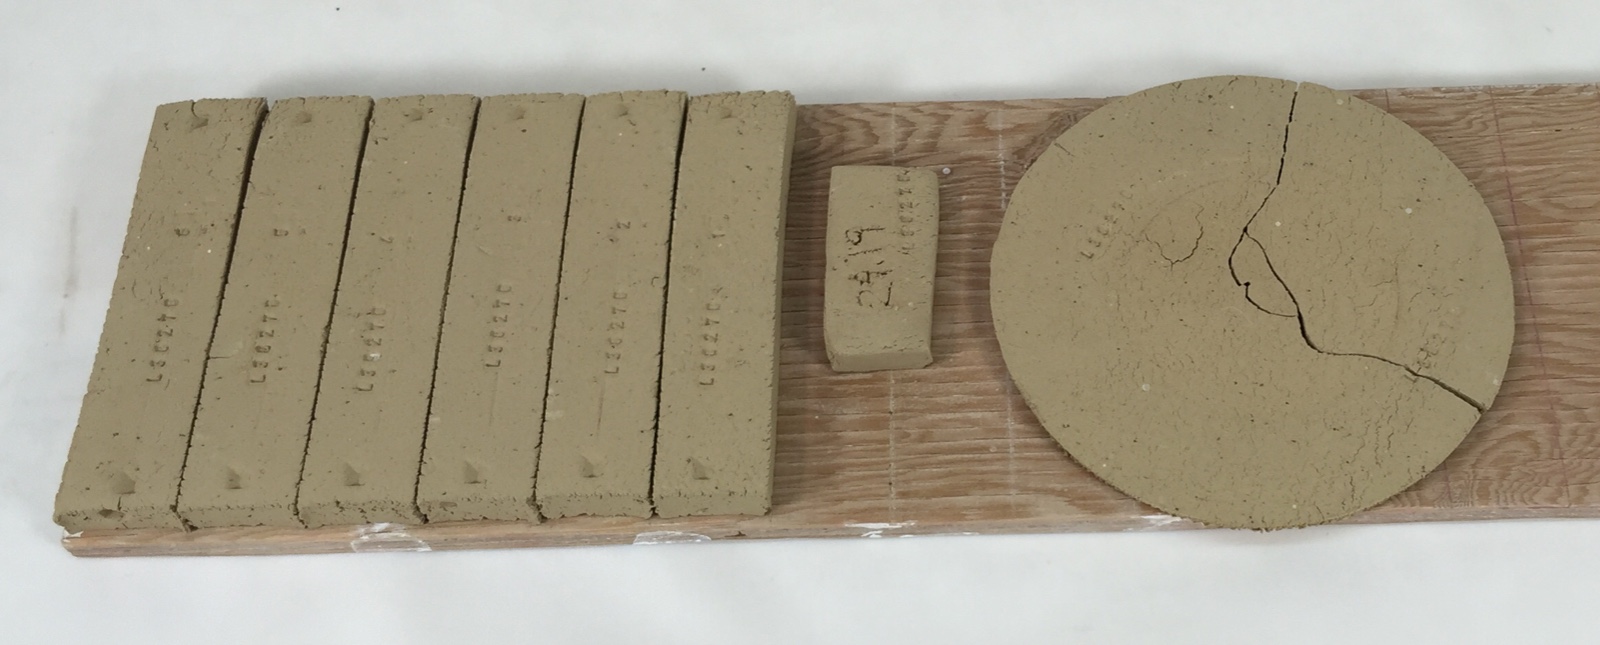
They are now dry. I actually encouraged these a little and placed them on the lid of an electric kiln that was firing over night. Notice the bars are straight and shrinkage is minimal. The drying disk does not have a darker color around the outer edge. It is not cracked as much as one would expect given the drastic variation in water content across its diameter that I subjected it to during drying (we will learn more about that shortly).
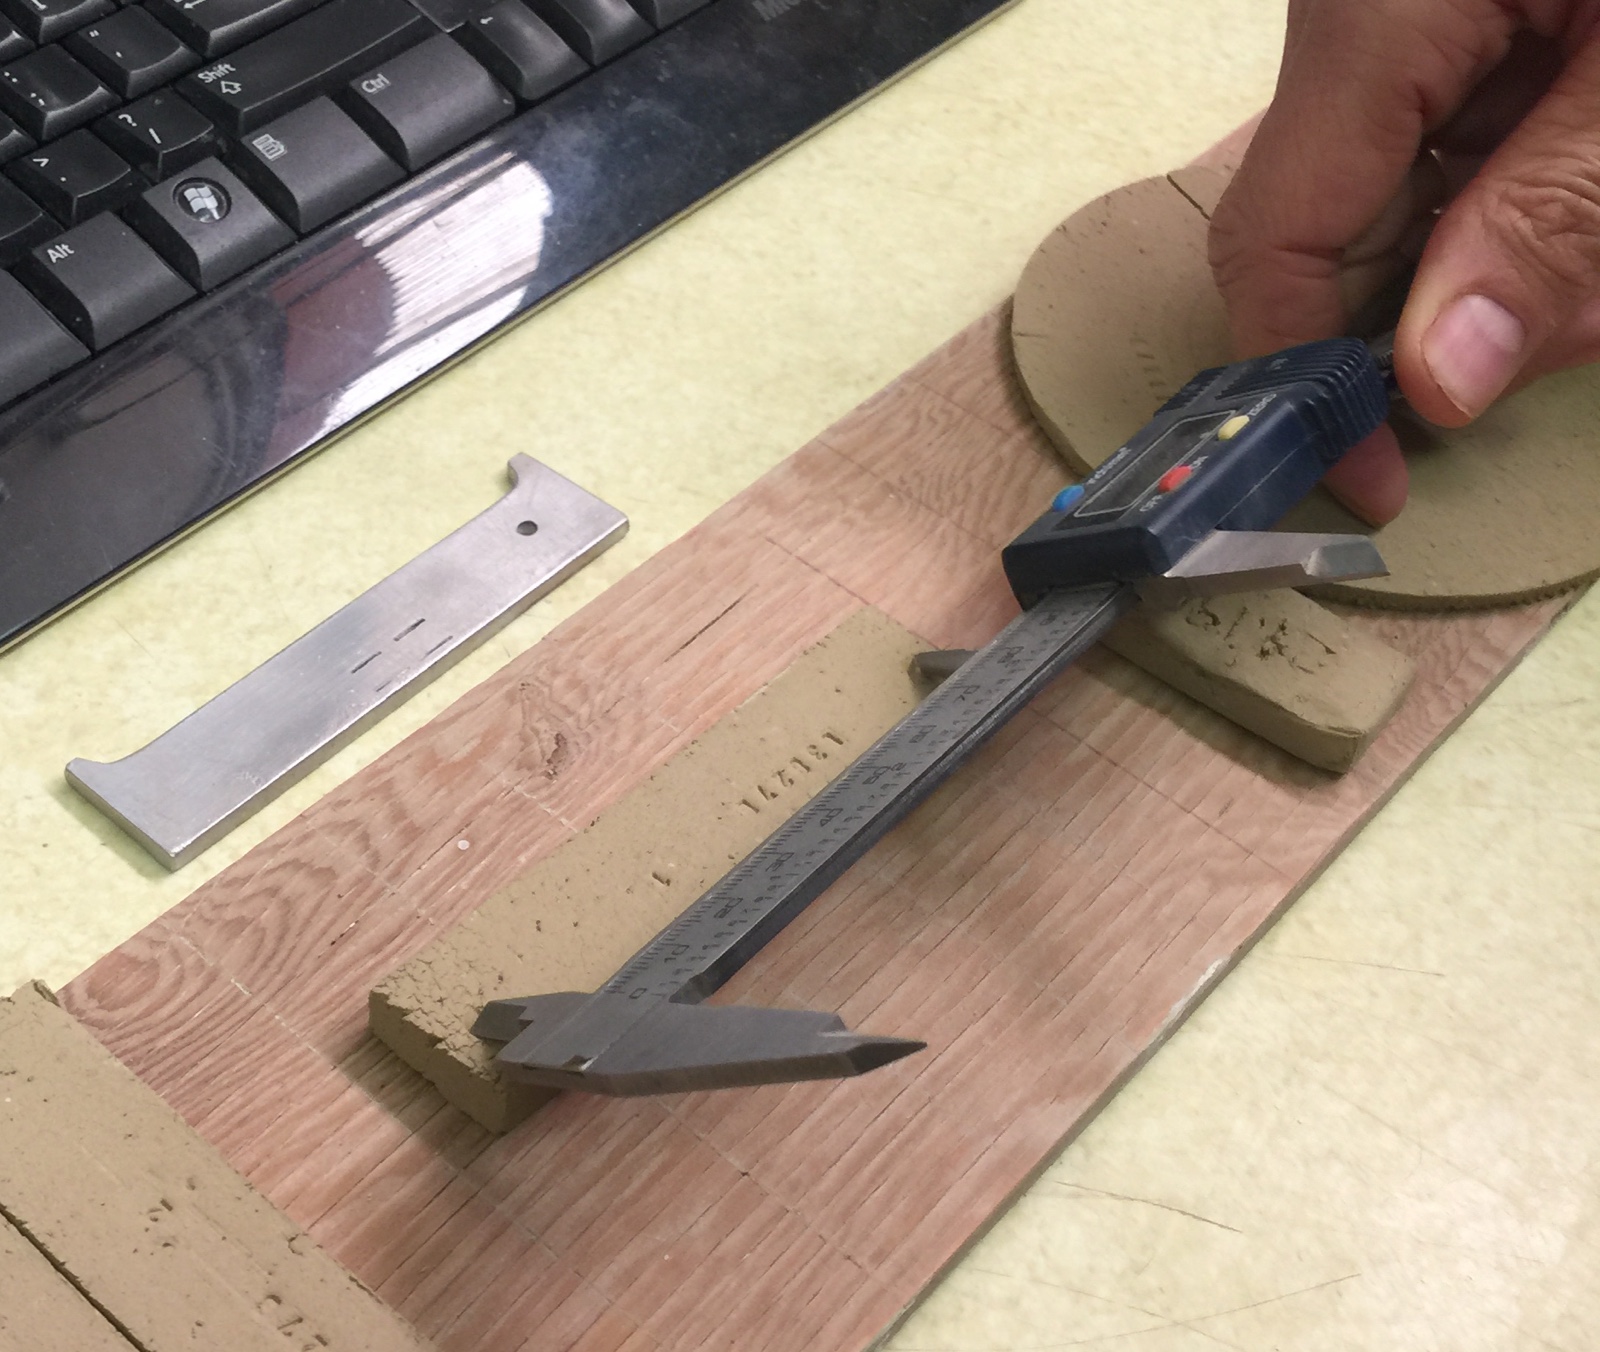
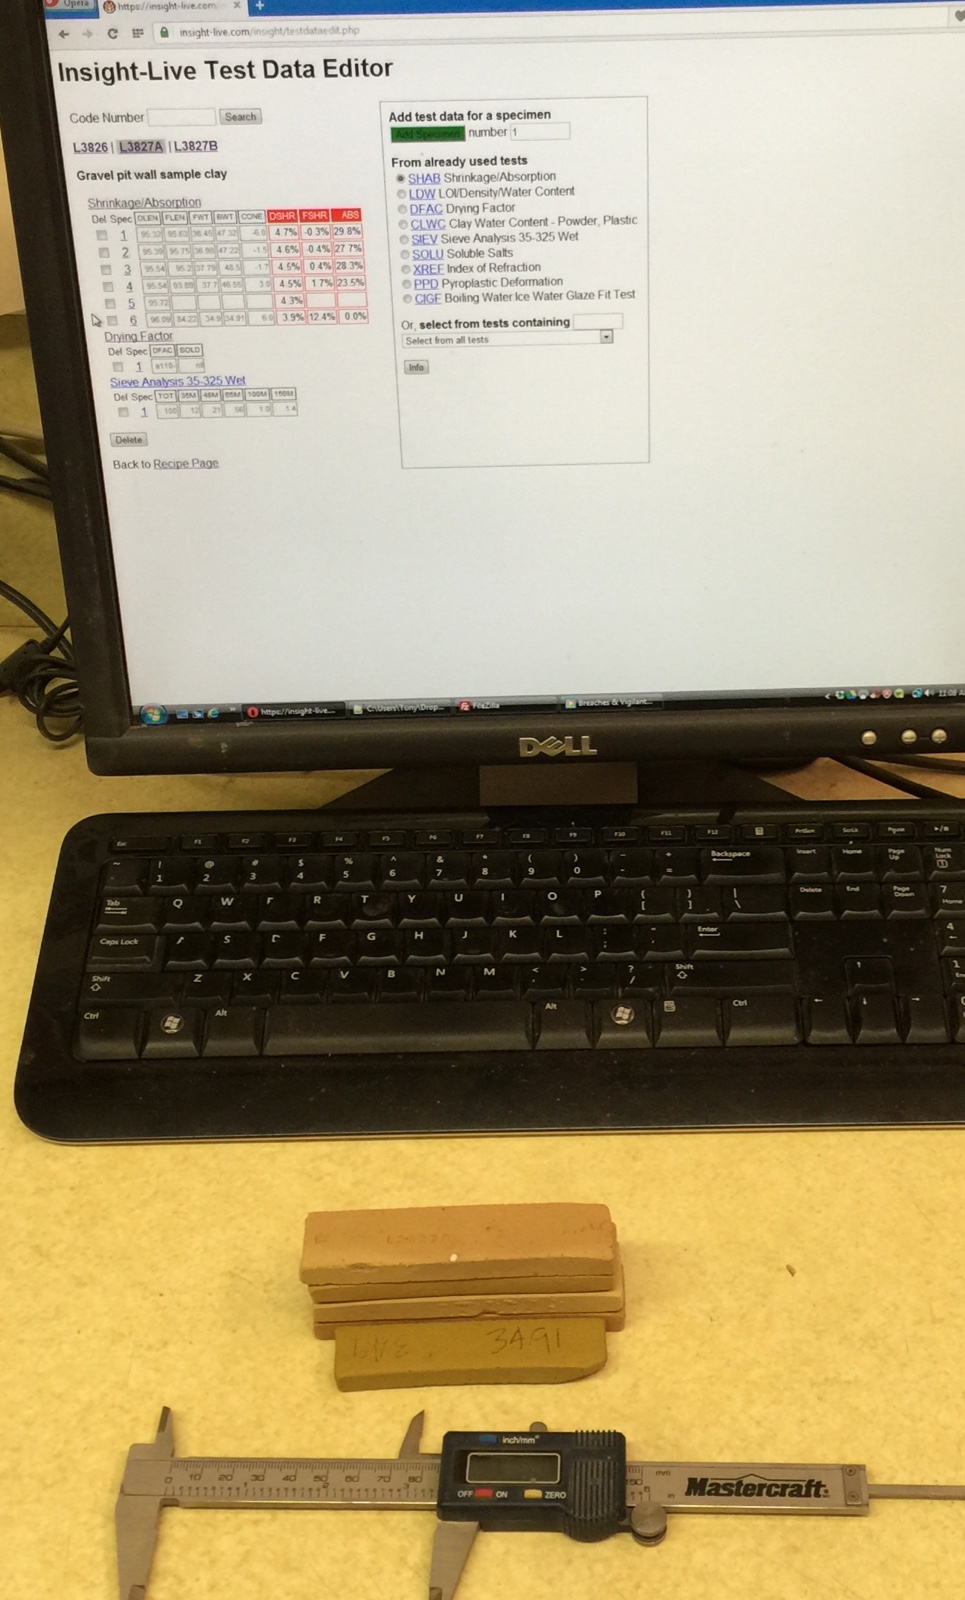
Measuring the SHAB and LDW Bars
SHAB is the abbreviation for the built-in shrinkage/absorption test procedure. LDW is the test for measuring Loss on Ignition (weight loss on firing), density and water content of the plastic material. Now that the specimens are dry I am ready to measure and weigh them. First, using a digital micrometer, I measure the distance between the marks (in mm) for each specimen-numbered bar. I write the number on the back of each.
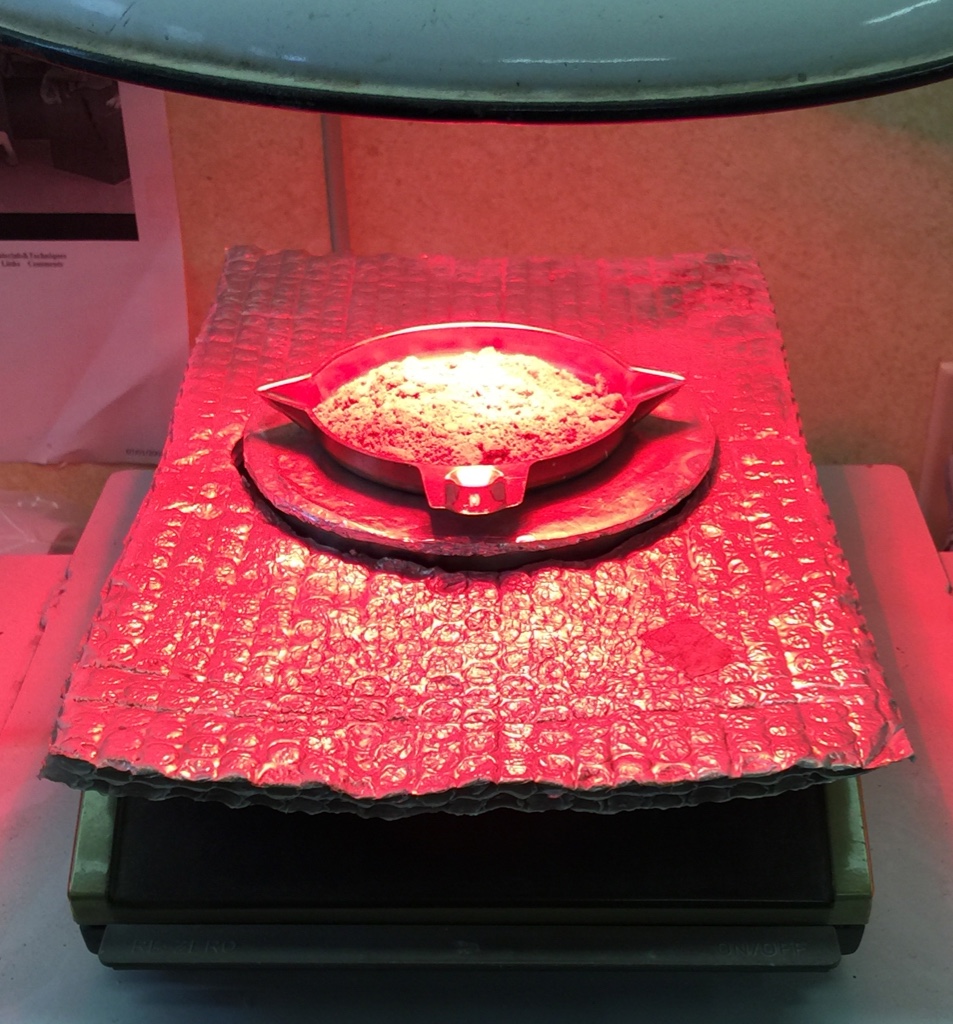
I also weigh the LDW specimen and write that weight on its back. It is worth noting that this sample must be completely dry. I make sure of that by placing them on the lid of a firing kiln over night.

Learning from the DFAC disk
The drying factor disk is the most difficult to interpret.

To learn more about it I can click the Drying Factor heading on the test data listing on the recipe panel. That will take me to its page in the Digitalfire Reference Database. That page outlines the procedure. At the bottom there are many pictures that will quickly familiarize you with the concept. The idea is that we need to note the nature of the crack and the degree. While not an absolute or precise test, it is good for comparing clays. The disk also affords opportunity to assess the amount of soluble salts that move to the surface during drying (they concentrate around the outer perimeter, having migrated there from the center section because it was not exposed to the air).
Remember that the center portion was covered during drying in front of the fan. It thus lagged behind, setting up stresses between the soft inner section trying to impose its shrinkage on the already dry and rigid outer. That causes the disk to crack. The severity of the crack becomes a way to compare drying performances.
Here is the dried disk of this clay. It has cracked, but not severely. Notice also that there are no souble salts visible (the outer edge is no darker). This is encouraging. How to I score the drying disk?
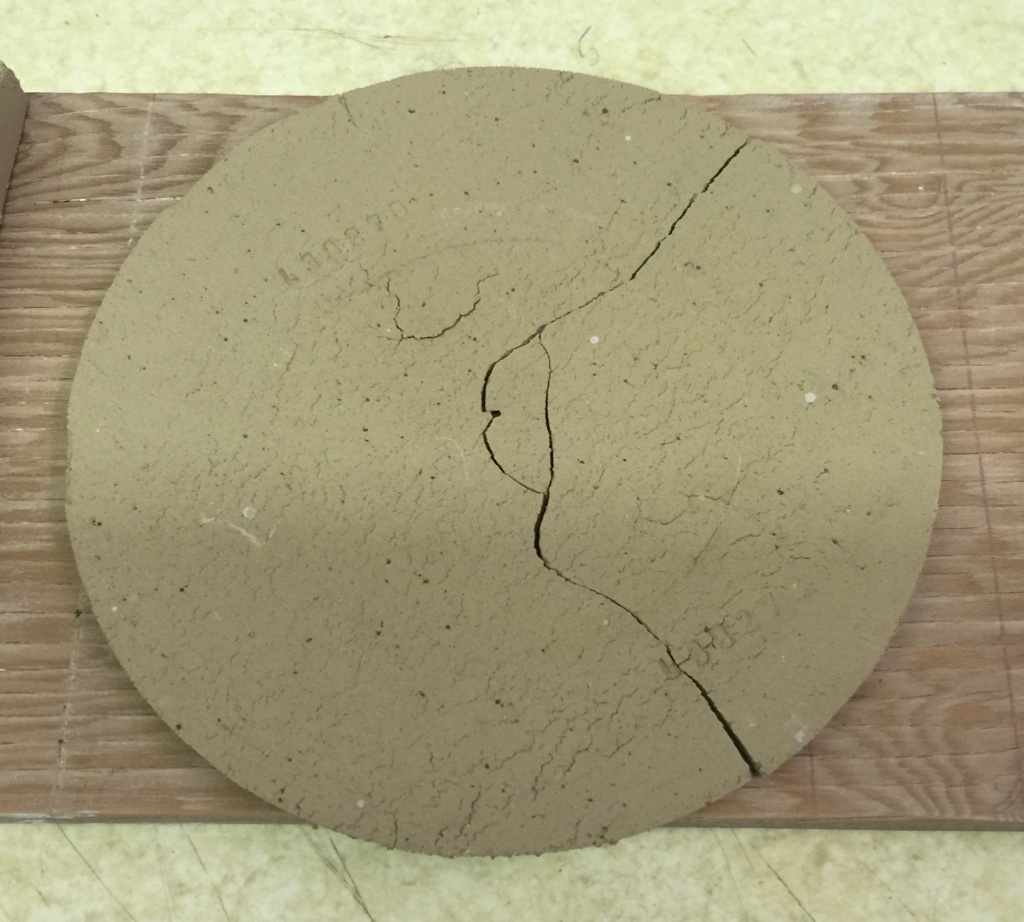

How to I score the above drying disk? Here is the legend I developed. I gave this one a score of C110-.
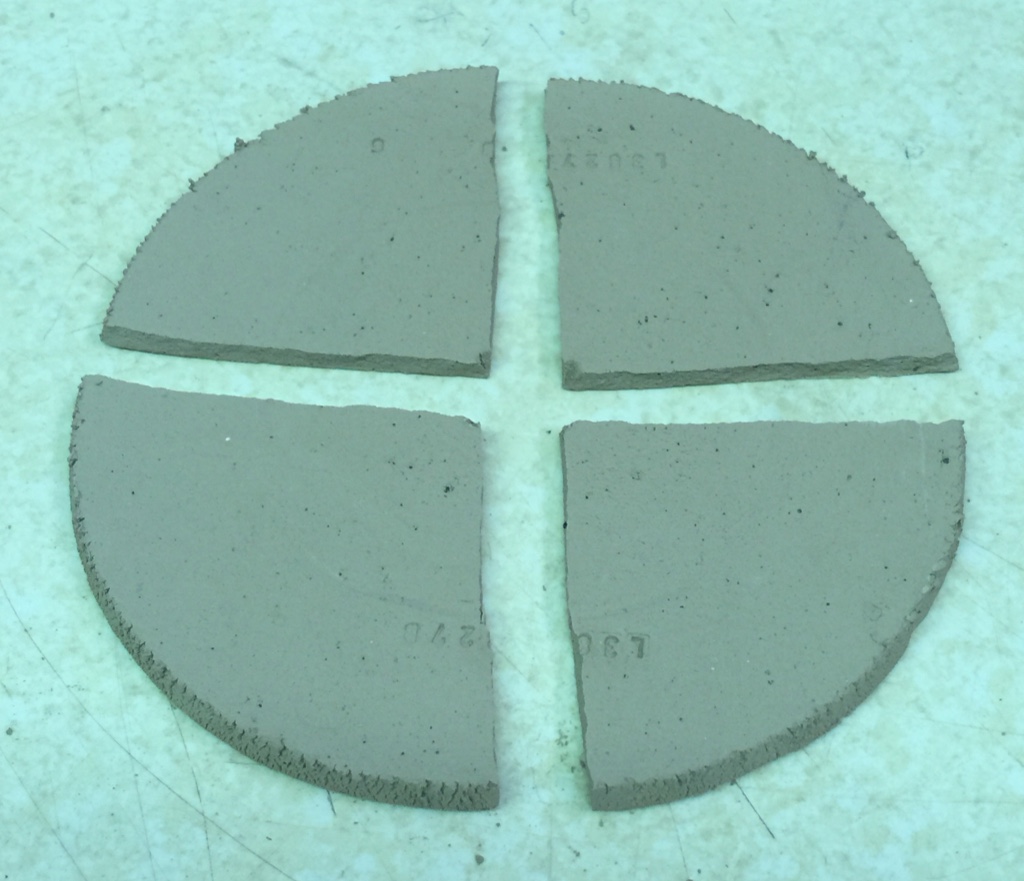
I can also assess the dry strength without even having expensive equipment. How? By simply breaking the disk into quarters. I have done this so many times that I know immediately how it rates between the strongest and weakest I am familiar with. This may not sound very accurate, but remember that I am more interested in comparative testing, comparing one clay with another. Give me two disks and I can tell you with a high degree of certainty which is stronger and by how much. I enter this as an observation in the notes.
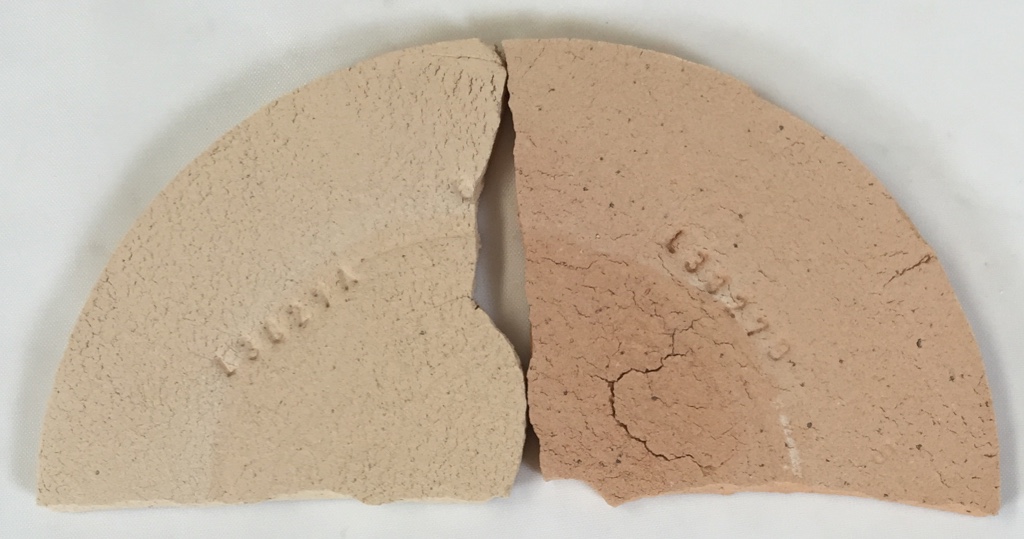
I have fired quarters of this disk (to cone 06) from this and the other sample send me. Now the soluble salts are more noticeable, the ones of this disk being greater.
Entering the data from the dried specimens
As done previously, I need to open the Test Data Editor for this recipe and enter the data I have been measuring (by clicking the little Edit button beside the Testdata heading in the open or previewing recipe panel).
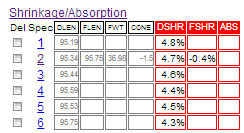
Notice I have entered all the length measurements from the shrinkage test bars and the drying factor. Notice it is calculating drying shrinkages between 4.3 and 4.8%. Typically they do not vary this much, it may be because I was handling the bars too so and deformed them slightly.

Here is what the recipe in my Insight-Live account looks like so far. Notice that I have also uploaded the picture of the fired DFAC disks showing the soluble salts.
Entering data from a fired SHAB test bar
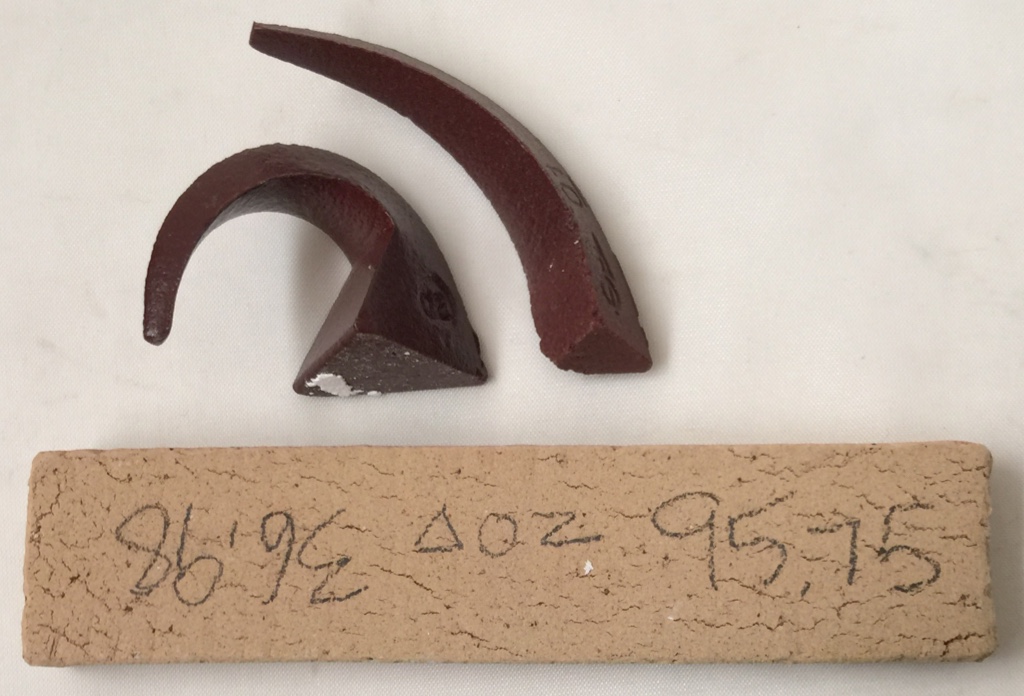
Here is the first fired test bar. I have weighed and measured it and written the numbers on the back (along with the cone).
How there is a little issue to deal with here. The cones. The 02 did bend and just touch but the 01 is around 2 oclock or more, so my kiln went higher than cone 02 in this firing. So what cone is this? The difference between cone 02 and 01 is about 30F. By the time the cone gets to 3 oclock, three quarters of that is gone. That means that a 3oclock cone 01 would make this cone -1.75 (remember we count backwards on the 0x cones). However based on my experience with this kiln, past firings and the fact that it has not reached 3 oclock, I am going to enter it as cone -1.5. The reason I enter it this way (instead of 01.5) is so the computer can place the temperature along an x-axis of 06 (-6.0) to 10 (10.0).

The firing schedule manager in Insight-live enables me to enter all my schedules. Here is the one for lab test bar firings to cone 02. I can take this to a kiln and manually program it to match. Notice that if I start it at 8.30 am it finishes at 3.20 in the afternoon. Notice also that I keep notes at the bottom on what happens each time I fire my two lab kilns. This guides me in future firings. It is always changing with the deterioration of the thermocouple and elements. When these are changed extra attention is needed.
I am ready to enter the data from this test bar. Here is the Test Data editor. This bar is specimen 2. So I need to click the "2" in the Spec column in the "Shrinkage/Absorption" section (to enable entering the new data I have for it).

That changes it to this. I have entered the firing length, fired weight and cone. How I can click Save. Actually, if I just press the enter key it will also save (since the Save button is the first and therefore default control).

Here is what happens after the save. Insight-live now has enough data to calculate the fired shrinkage for cone 02. Notice it is negative! That means the bar not only does not shrink during the firing, it grows. This is highly unusual! Especially at this high of a temperature (2000F). Although the bar is not showing any signs of vitrifying yet, it has reasonable strength. This could turn out to be a special purpose clay, we will see.
Entering data from boiled test bars
Using an account at Insight-live.com I can organize testing of dozens of different clays at the same time.
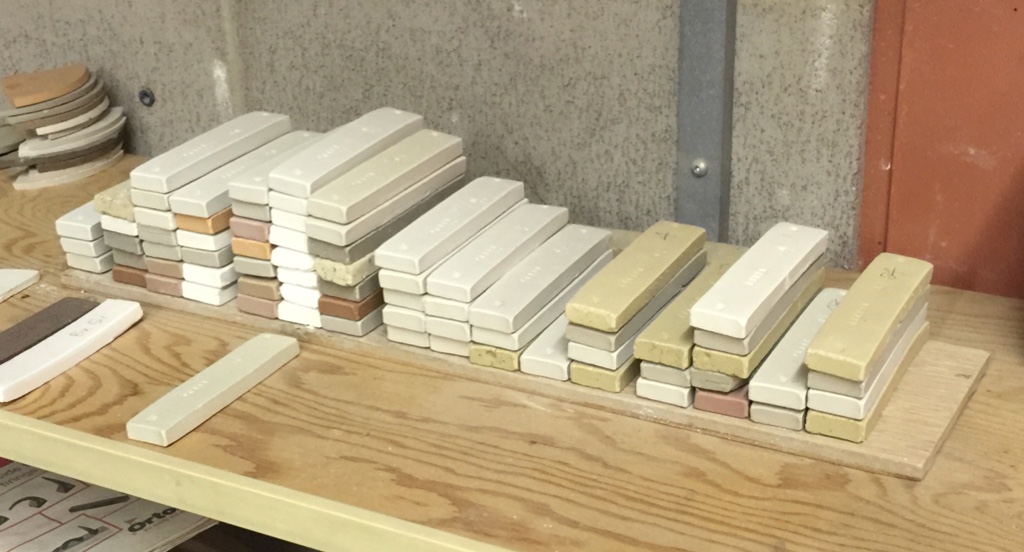
These are the bars I have waiting to fire this week, there are batches for a dozen temperatures. Every bar is identified with code and specimen numbers.
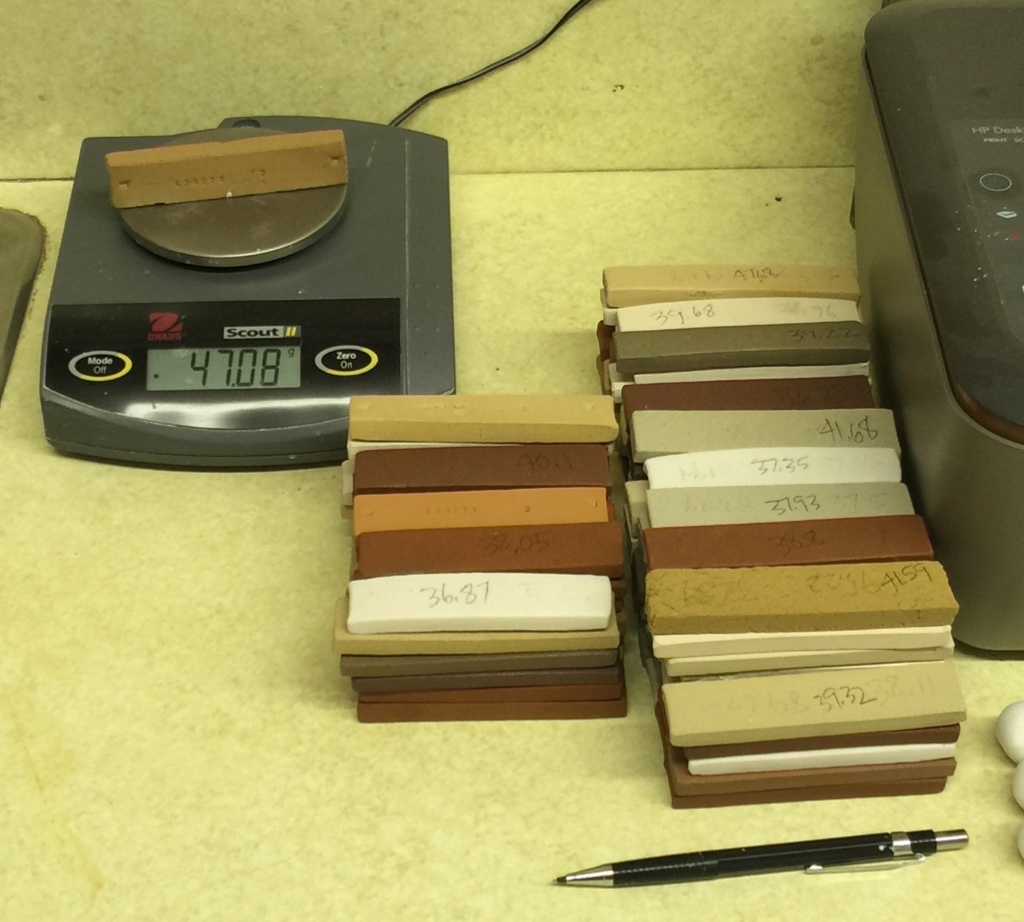
Here is the batch of about one hundred SHAB bars that contain ones from the test clay we have been working on. I have just finished boiling them (5 hour boil and 19 hour soak). I am taking them in batches, blotting them on a towel and then weighing each and writing that weight on the backs.
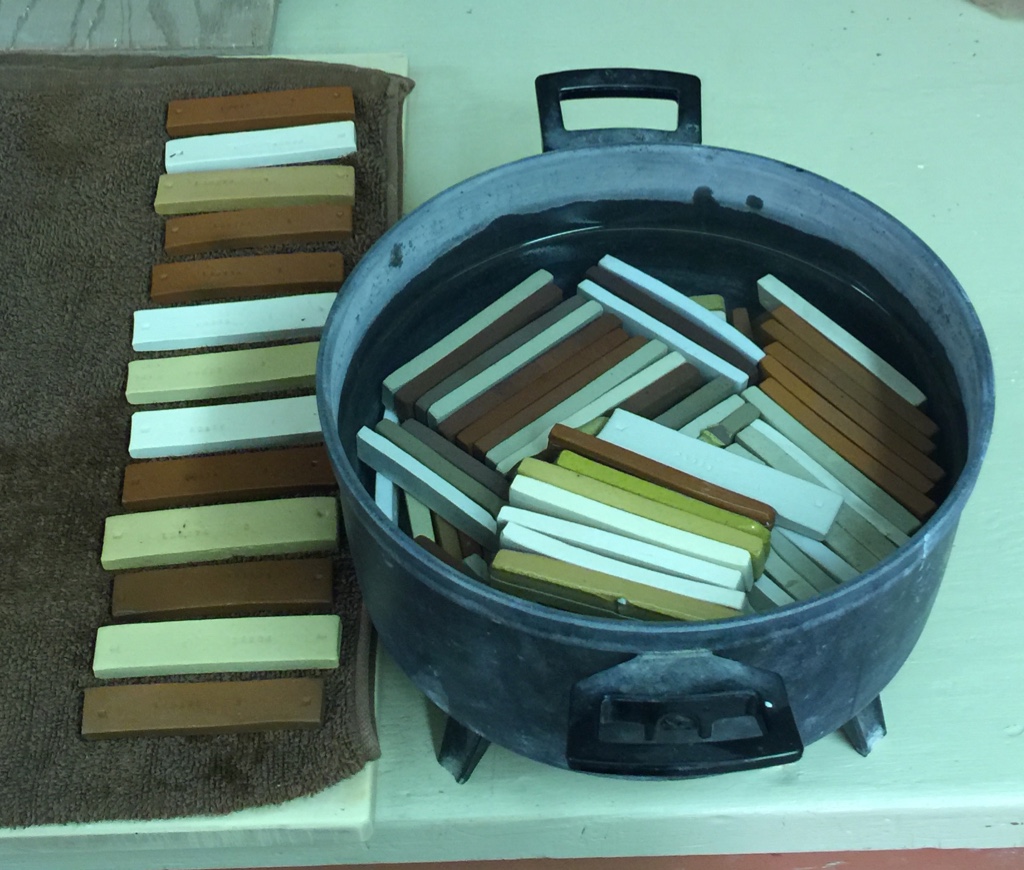
Here is one of the ones from our clay.
I have them all weighed and have organized them into piles of the same codenumber.
Now I am entering the boiled weights into the record for this clay.
Two weeks later: More data, linking pictures
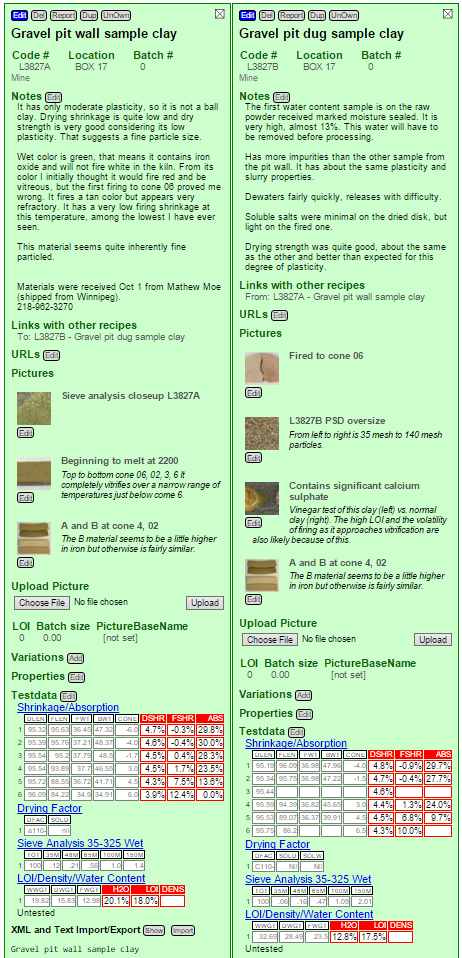
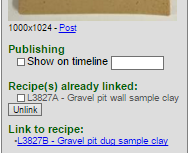
It is a couple of weeks later. I have collected alot of weights and measurements that enable me to compare fired shrinkages and porosities of the two materials (from the floor and wall of the quarry). As it turns out, the two clay samples from that gravel pit have pretty similar properties fired maturity. The other properties are similar also (although one fires to a darker color). Notice that I have also uploaded a number of photos and entered notes for them.

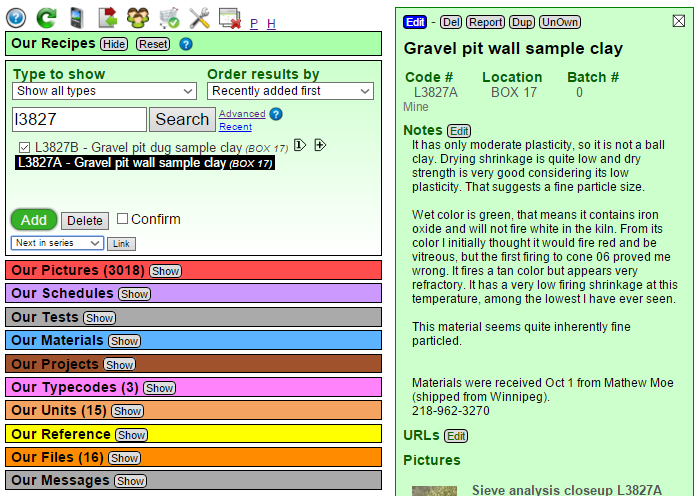
Before going on, how did I get both of these open? I already had a link in A that opened B (it is below the notes). How did I make that link?
Notice (below) that I have searched the root codenumber, L3827. I have opened L3827A. I have clicked the checkbox in front of B (in the search list above the green Add button), changed the link list option to Next in Series (below the green Add button) and am about to click the Link button beside it. That creates the link. In this way you can link one recipe to more than one at a time.
One of the photos is shown in both columns, yet I only uploaded it once. How?
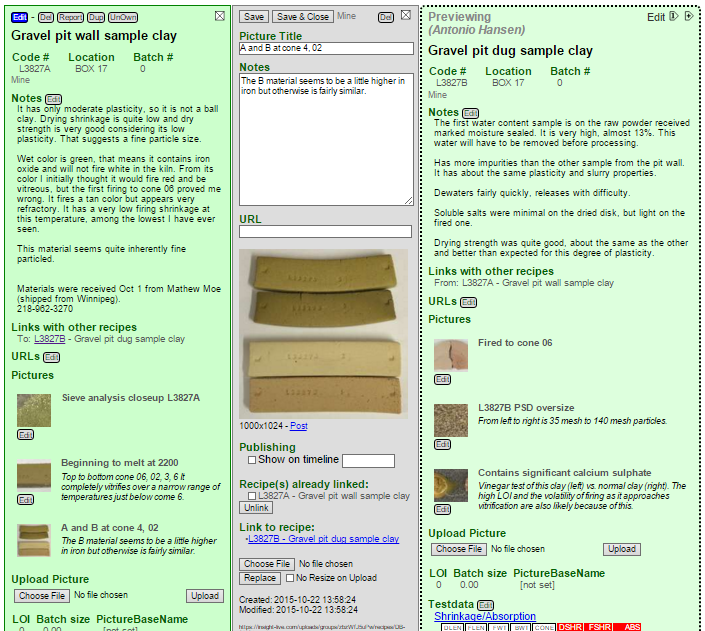
I uploaded it first for to L3827A. Then I opened the photo in a panel by clicking its Edit button, entered the title and some notes and saved (above). Then I clicked to preview L3827B (it is showing on the right, the dotted border indicates it is not open).
 Notice the picture panel shows links to the recipe already linked to (A) and a Create Link to the one previewing (also works if it is open). By clicking this the picture will link to L3827B also.
Pictures exist as separate entities in Insight-Live, pictures can be searched like recipes and when you find the one you want it has a link to the recipe(s) it belongs to.
What might these clays be useful for?
First, they are unusual. Look at these test numbers (in the picture below).
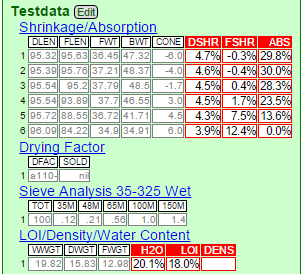
- The porosity (column titled ABS) is extremely high, all the way to cone 3. Most clays will be one third of this. Some ceramic applications require porosity (e.g. as a filtering medium, to absorb oils or water), so this might have application there. Notice the FSHR column, that is fired shrinkage. These numbers are even more amazing. At cone 06 and 04 the material actually has a negative shrinkage (it grows during firing). At cone 02 it is close to zero and is starting to develop some good fired strength. Yet it has 28% porosity there. Amazing!
- Notice the drying shrinkage: It is low because plasticity is low. However if better workability is needed bentonite could easily be added.
- Notice the Drying Factor section, the SOLD column. That refers to the soluble salts found on the drying disk. They are nil. This clay is clean, it will not fire with a glassy scum (called efflorescence).
- Notice the Sieve Analysis. The number add up to less than 4. That means that 96% of the material goes through a 150 mesh screen without any grinding. The material is therefore inherently very fine particled, it will not be difficult to process into a final powdered product.
- Notice the LOI/Density/Water content section. Water content of the plastic material is about normal, but the LOI is very high (typical stoneware and eartheware clays have 6-8%, kaolins 12-13%; but this has 18%. This was not visible as organic material in the sample and to be honest I do not know what it was. But if it is sulphates that could be a deal breaker, these would produce alot of toxic gases on firing. More investigation is needed.
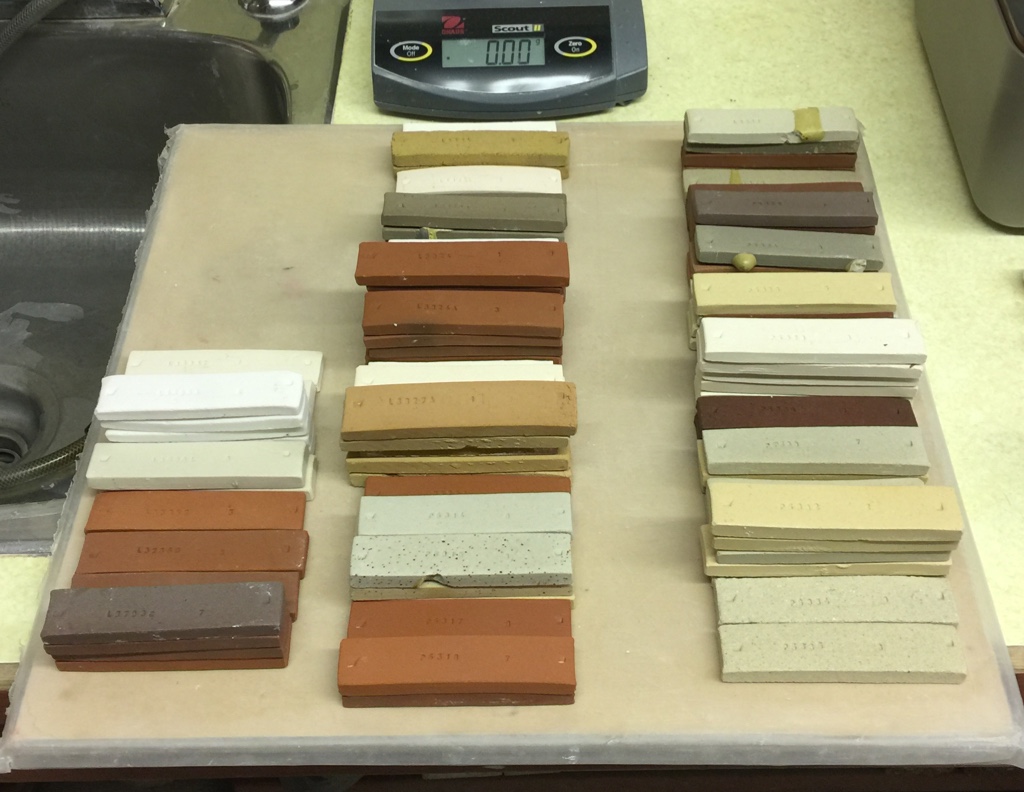
Now look at this picture. The top bars are the A and B material fired to cone 4, the bottom ones to cone 02 (mentioned above as a sweet-spot zero shrinkage temperature).
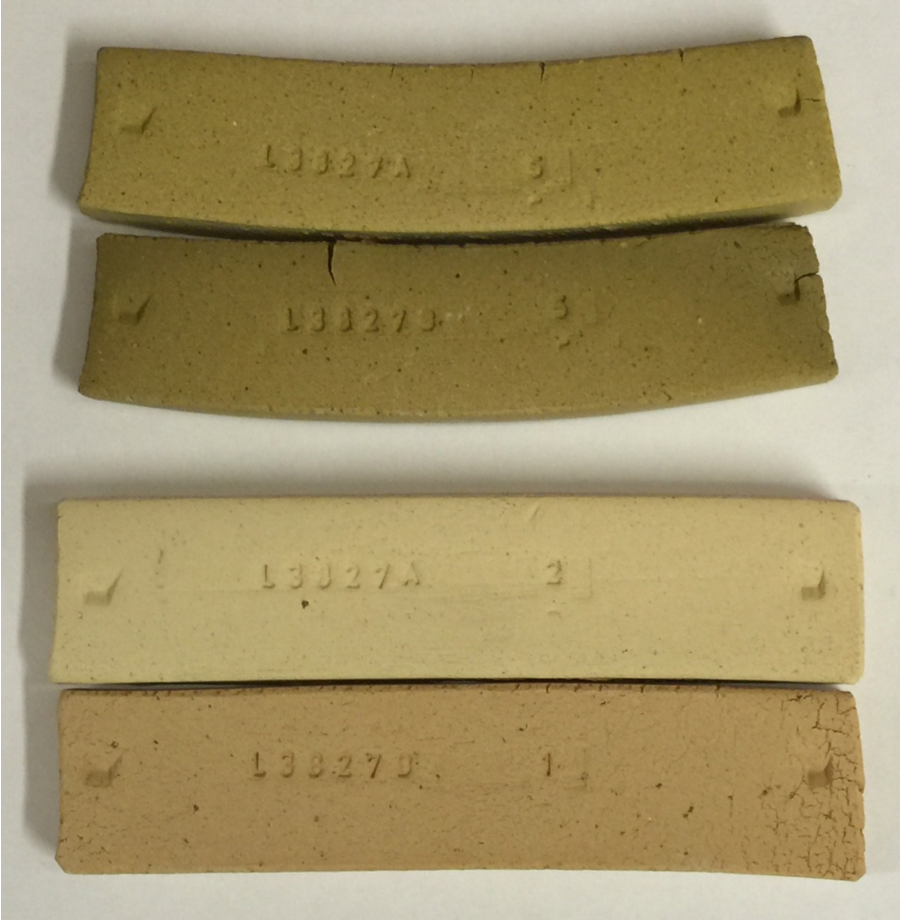
Notice the curve on the top ones. Why did that happen? Because they curved toward the elements during firing (the hot side shrinking more than the cold one). The clay is therefore quite volatile in this range (even though it still has more than 10% porosity). Notice the numbers in the FSHR column (fired shrinkage; in the Testdata picture above): They rise dramatically after cone 3. Notice the porosity at cone 3 is 23.5% and at cone 4.5 it is 13.6%. That is a dramatic drop in one and a half cones. It would mean that the maximum likely practical temperate to fire it would be around cone 3. At that temperature the bar is straight, has only 2% fired shrinkage, has good strength yet still has 23% porosity. Amazing! This would be a great clay to make water coolers from, it is so much more porous than the traditional earthenware ones that are made and so much stronger.
As you can see, having numbers and data telling us the physical properties of the powder, the dry and drying material and the fired product give us the only practical way to characterize a material like this. More often than not, it is not so much the absolute values of the data that are important, but the ability to compare one material with another.