Overview
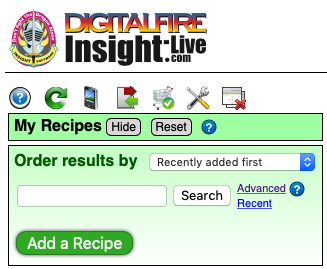
The Recipe Manager displays on the upper left of the home page. Much of your time using Inight-live is spent here. It is light green and can be open or hidden (closed) using the Show and Hide buttons in the title bar (the Reset button closes all Managers and any other panels that open to the right.
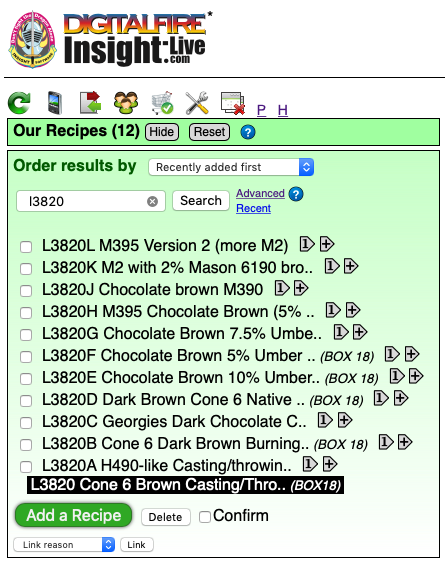
The Recipe Manager Panel
It features search controls, a hitlist of recipes and accompanying paging controls (and other controls that appear when appropriate). Items in the list show the code number, if present, the recipe name and the storage location in brackets.Recipes that are open in panels to the right are highlighted in the list. When none are open a timeline displays (depending on preferences).
Recipe Checkboxes
Individual recipes in the hitlist have a check box in front of them (if turned on in your preferences). The checkbox is used for linking, deleting and exporting (buttons below the list operate on these).
Linking Recipes
The Link button (and accompanying link-reason popup list) only appears when one recipe panel is open (when no recipes are open the Export menu appears). To link a recipe to the one that is open in a panel:
- Find the recipe to be linked to in the list
- Tap or click its checkbox
- Tap or click the Link button
Deleting Recipes
When one or more items in the hitlist are checked and the Confirm checkbox is checked the Delete button will remove the recipe(s).
Exporting Recipes
Check the recipes to export and choose an export option.
Opening Recipes
These  will appear after items in the list (if you have them enabled in preferences). The first opens that recipe either as the only open one (closing all other panels that may have been open) or in a new panel to the right of existing ones. The second on opens the recipe in a panel to the right, after any others there.
Adding a New Recipe - Quick Version
Typically, new recipes are added using the green Add a Recipe button in the Recipe Manager box.
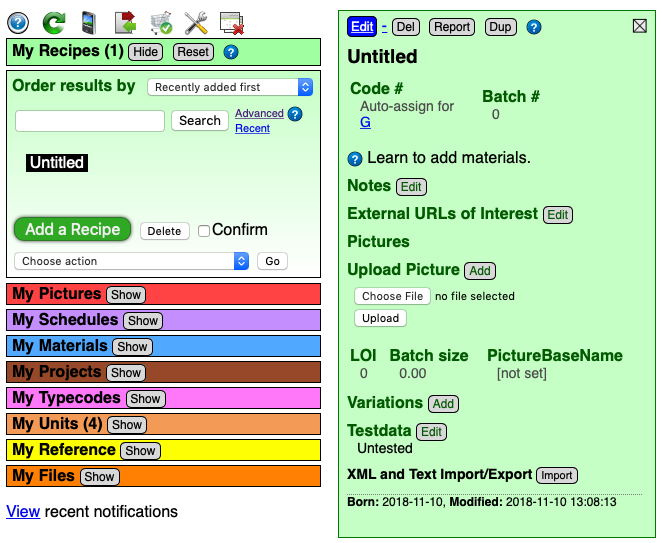
New or opened recipes display in 'panels' that accumulate right-ward.
Click the blue Edit button to go into edit mode.
First, change the title and description. Titles generally specify temperature, name, surface and color (e.g. Cone 6 Panama Ultra Gloss Peacock Blue). In the description field enter keywords and things like its lineage or mechanism (e.g. "Fluid melt clear base with copper addition").
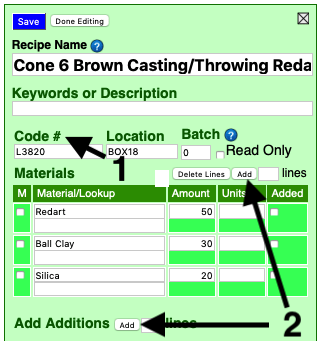
1. The code number is important. Write it on test specimens. We suggest the format X1234 (e.g. P1234-production, G1234-glaze, L-1234-lab tests, etc).
2. Use the Add lines buttons, optionally specifying the number of lines wanted in the blanks provided (the default is to add one line).
Fill in the material names and amounts and click to tap the Done Editing button at the top.
You now have a recipe.
Silent Video
Audio Video: Entering a Recipe
You can also watch this at Screencast-o-matic.com
Add a Recipe by Duplicating
Atop the frame of an open recipe is a button to duplicate it. This is a handy way of adding a recipe similar one already present (the code number and certain other attributes are not duplicated). Remove or edit the note, change the name, code number it and then save.
Add a Recipe by Parsing Text
At the bottom of recipe panels there is a heading "XML and Text Import/Export" with an accompanying Import button. It produces a dialog like the following. Enter the recipe title and materials as shown, check the Confirm checkbox and click or tap the Interpret as Text button.
Unlinked Recipe Materials
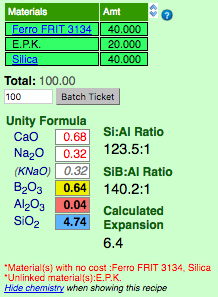
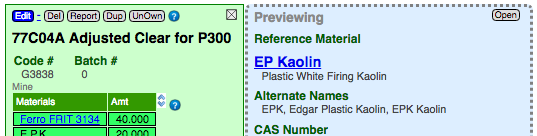
Notice that the red alert below this recipe warns of an "unlinked material". In the recipe above it, the material "E.P.K." is not clickable because it was not found. There is no material in the materials database having this name (or alternate name). To fix this problem you need to know what spelling to use. Below I have opened the Materials Manager (the blue bar on the left).
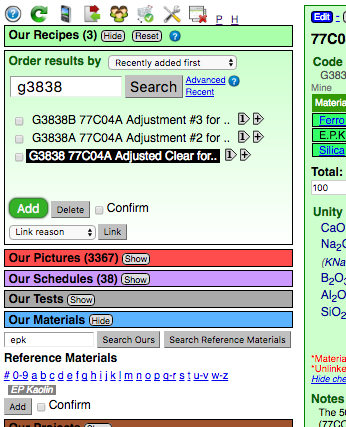
I have searched "EPK" and clicked the Search Reference Materials button. It found "EP Kaolin". I clicked on that. Below you can see that that has opened EP Kaolin in a blue materials panel on the right.
Notice it shows that the proper name is "EP Kaolin".
However among the alternate names I can use is "EPK". I will click the blue "Edit" button on the recipe panel...
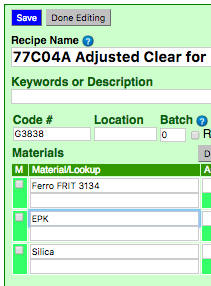
...then change the material name to "EPK". And click Done Editing.
Notice the EPK is now clickable (and therefore found in the materials database). That means the chemistry calculation now includes the chemistry of EPK.
Previewing and Opening Recipes
The "Auto-open recipes on click" setting on the Preferences page determines how recipes are opened.
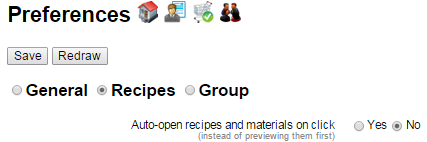
If it is on, clicking a recipe in the hit list opens it. If it is off (recommended) recipes preview first (with a dotted line border). Recipes open in panels going rightward across the page (to a maximum of ten) so you can quickly have too many open (the Reset button in the recipe manager title bar will close all panels). We recommend turning Auto-open Recipes off in Preferences. This will reveal quick-open buttons to the right of each item in the picklist. One opens the recipe as the only panel, the other as as additional one.
Much of the functionality of Insight-live is fine-tuned around its intelligent panel previewing and opening workflow. This minimizes page refreshes and horizontal panel glut (a big benefit on portable devices).
A Previewing Recipe
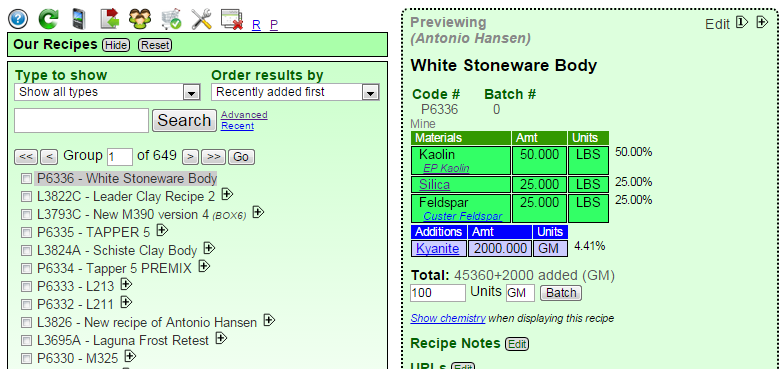
Notice that when the recipe is being previewed its item in the list is greyed and the preview panel itself has a dotted border. The preview panel displays various buttons to edit some details about the recipe (e.g. its notes, testdata, urls). Clicking these will bring up a separate panel or page to make the changes. When you save changes this preview panel gone (because it was not open). This behavior is desirable on portable devices as it avoids unnecessary clutter horizontally.
An Open Recipe
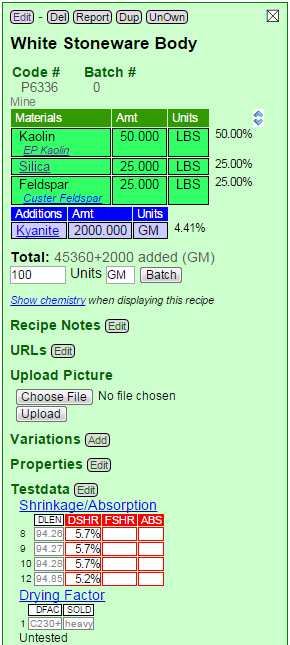
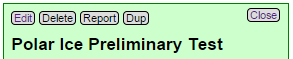
When a recipe is open, its name in the Recipe Manager hitlist is highlighted white-on-black, it's checkbox will disappear and the boundary around its panel will change to a solid line. In this state more editing options will be available and atop the frame are controls to edit, delete, print a report and duplicate the recipe.
Open recipes stay open (even across sessions) until you click the close box (upper right) or use the Reset or Close All icons.
Note: During edit, the page will display popup help tips in your desktop browser (as your cursor dwells over the various fields).
A Recipe in Edit Mode
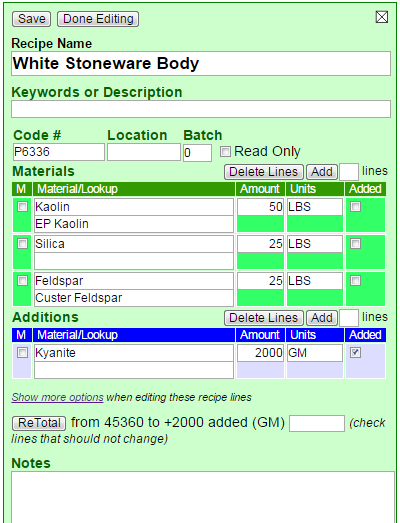
This mode is not persistent. It is intended that you make the changes and click the Save or Done Editing buttons right away. The Delete Lines and Add lines buttons will leave Edit mode active. Certain editing controls that were available in Open mode are not available in Edit mode.
Edit mode is the place to re-total a recipe using the controls below the recipe lines. If a recipe contains units-of-measure it is assumed that you are specifying base units for the retotal. To not include certain lines, check their Mark checkboxes before the retotal.
Some of the items visible in Edit mode (e.g. private notes, email) are not shown in Open or Preview modes. While you can edit the notes in Edit mode, it is often easier to click the Edit button next to the Notes title to open the Notes panel beside the recipe. That panel provides more room and you can see the recipe while entering the notes. It also provides a location to enter batch ticket specific notes.
Editing Recipe Data Fields
You can also watch this at Screencast-o-matic.com
To edit the data in a recipe panel click the blue Edit button at the top of the panel (that will change the mode from viewing to editing).
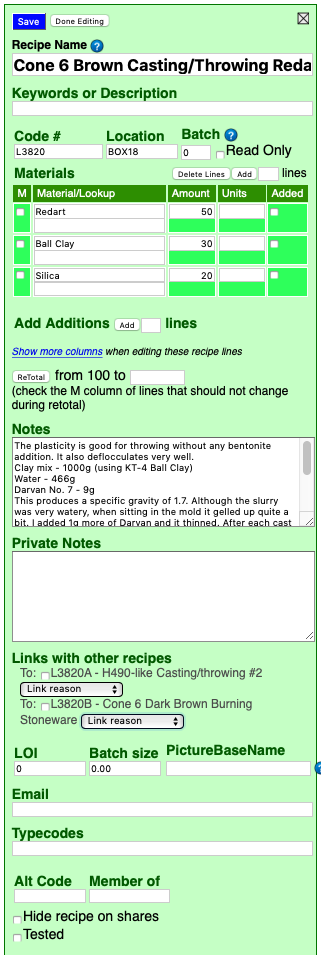
Recipe Name: A standalone name that clearly identifies the recipe from others. One name pattern many people use is Cone-Name-Surface-Color (e.g. Cone 6 Panama High-gloss Peacock Blue).
Keywords or Description: Description and keywords that help to describe what the glaze is. For the above glaze it might be: High melt fluid transparent base with copper carbonate.
Code Number: Printed with the name at the top of reports, in searches and listings. A key organizational aspect of maintaining recipe and test records is an effective code numbering system. Write this on test specimens to link them to here. This number should be unique and non-ambiguous. We suggest a number in the form ‘AnnnnA’ where the first digit denotes the group or type of test (e.g. P for Production run, G for glaze test, L for lab test, etc.). The next digits are sequential within the group (e.g. 1, 2, 3, etc.). The last digit is a variation on a series (e.g. G1214N would be the test N of the series G1214). The preferences dialog enables you to set up code number prefixes for automatic assignment and how they should be sorted when the list of recipes is viewed in code number order.
Location: Enter the location(s) where test specimens are stored in your specimen storage system. Since you can ‘organize’ and find information easily on the computer, you do not need to organize your specimen storage beyond simple sequential numbering of shelves or boxes. Furthermore, it does not matter where a specimen is stored, as long as its location is recorded here. Typically a room-shelf-box system is used and a hyphenated code is keyed into the location blank. Or, test specimens are glued on numbered boards stored on shelves sequentially (in this case the board number is entered into the Location blank).
Batch: When recipes are imported you assign a batch number to them. Change it for an individual recipe here.
Recipe Lines: See next section.
Materials: The actual materials in the recipe. Enter the number of lines you want to add and click Save.
Additions: The added materials (like colorants, opacifiers, variegators).
Retotal: Retotal the recipe.
Notes: Anything you want. If the recipe is going to be published do not enter private information here.
Private Notes: These notes are not shown on published recipes.
Links with Other Recipes: These are set in the recipe manager list (with a single recipe open in a panel).
LOI: Specify an LOI (loss on ignition, the amount of weight the recipe loses on firing) to override that calculated one.
Batch Size: The default batch size for printed mix tickets. It is assumed to be in the base units (defined in the Units manager).
Picture Basename: Used to link imported picture file batches to their parent recipes. If the base picture file name matches this value, the picture will attach. For example, if the Picture Basename is xyz, then pictures files named xyz-1.jpg, xyz-2.png, etc. will link.
Email: Enter an email address if applicable for this recipe.
Typecodes: Typecodes are defined in the Typecodes section and have a two or three letter code and description. Enter the codes here separated by spaces.
Alt Code: An alternate code number (perhaps a legacy number used in a former database system)
Member of: Assign to named groups (not used procedurally yet).
Hide Recipe on Shares
Tested: Used in groups to signify if certain testing has been done.
Adding/Editing Recipe Lines
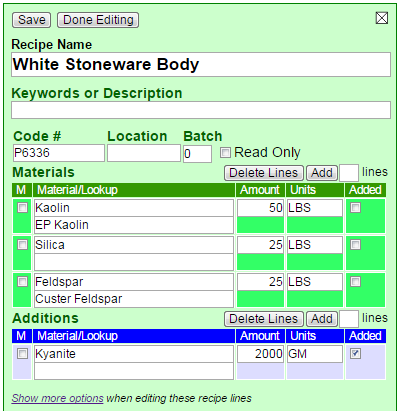
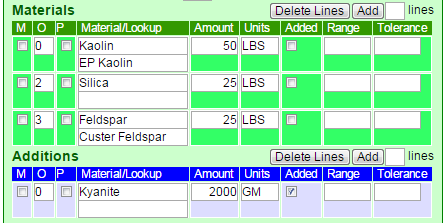
The recipe needs to be in Edit mode to add, remove or edit recipe lines. When Edit Mode is first enter for a recipe, lines will be shown with fewer columns (certain options hidden). Click the Show More Options link (below the recipe lines) to display these (they include range, tolerance, ordering, phantom status). Every recipe remembers its own display options setting.
Adding lines
Use the Add button atop the green and blue lines sections. Clicking it will add one line to the respective section (enter a number in the adjoining blank first to add that many lines). The blue Additions section is intended for colorants and opacifiers. Added lines also have the checkbox checked in the Added column. Unchecking or checking them in either section and then saving will move the lines to the appropriate section.
Recipe lines are stored in a separate database table linked to the recipe, thus you can have an unlimited number of lines.
Deleting lines
Click the mark checkbox at the beginning of the line(s) to be deleted, then click the Delete Lines button atop that section to remove them.
Columns
When using a desktop browser popup help tips will display when passing the cursor over the column headings.
M Mark column: Use this type mark lines to be included in an operation (e.g. re-totaling the recipe, deleting lines).
O Order column (not shown in Less Options mode): Assigned automatically as lines are added. Change these and save to change the order of the lines.
P Phantom status column (not shown in Less Options mode): Check boxes in this column to exclude materials from participation in chemistry calculations.
Material/Lookup column: Two things can be entered here. The first one is for the name of the material as you want it to appear in the recipe or mix ticket. By default that is the one that will be searched in the materials table to find the chemistry, cost, etc. Override that search using the second blank. This scheme enables you the flexibility of labeling a material as generic while using the chemistry of a name brand (or vice versa) or labeling a material according to specific shipment (common on mix tickets) while using a standard chemistry.
For a material to be successfully found you must enter it exactly as it appears in the materials database. To know what spelling to use, open the materials manager and search. When searching there you only have to enter part of the name. However in recipes the whole name must be entered. Unlike desktop Insight, an exact match to the name is required because there are so many more materials in the database and the chances of an unintended link (and therefore a misleading chemistry calculation) are much more likely.
Amount column: Enter a number with up to five decimal places.
Units column: Specify a unit abbreviation from the Units manager. The conversion data defined there will be used to calculate the actual percentage of this material in the recipe. A recipe can have materials of multiple units. Invalid units are flagged and will nullify any batch total or chemistry calculations. If all the units in a recipe are the same, it is usually better to leave this column blank.
Added column: Move a line to the green or blue section using this and saving the recipe (colorants, opacifiers, variegators, binders, etc. are usually considered additives). If you need to enter multiple versions of a base recipe with additions (e.g. different colors), use Variations instead.
Range column (not shown in Less Options mode): Specify a range like this: 1.5-2.5. This is used for target and limit formulas.
Tolerance column (not shown in Less Options mode): Similar to Range, but specifies a +/- value to the amount instead. This was used in desktop Insight but we now recommend Range instead.
The Title: Choose it Carefully
Classifying Recipes: We do not provide dedicated database fields to classify recipes in many ways (eg. color, surface, cone, transparency, etc), rather, these principle characteristics should be embodied in the title (for example, "G1214Z matte cone 6 colorless base glaze"). This avoids the danger of over-classifying and mis-classifying recipes. Most often a glaze, for example, can be many things depending on how it is fired, applied, its thickness, its interaction with the body and other glazes, etc. Attempts to pigeonhole glazes by explicitly defining multiple discreet characteristics often takes a tunnel-vision view of its dynamic nature across varying temperatures and processes. Over-classification also narrows opportunities for use and can demonstrate an ignorance of the mechanisms of some of the characteristics (these can be tenuous and difficult to duplicate). Thus the glaze name or title should be understood as a description from the original contributor to introduce us to the glaze. When we add the testing component to the system, the physical characteristics of a glaze under varying conditions will be evident by test results, not classification. Membership in multiple categories can be established by the type coding mechanism of the site, by linking and by keywords in the description field.Using Code Numbers
All recipes should have a code number assigned. This system is designed for numbers in the pattern Pxxxx where P is a prefix indicating the type of test being done. It is very important that all lab specimens are labelled with this number so they can be linked with records here.
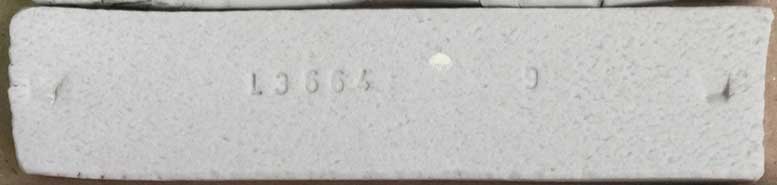
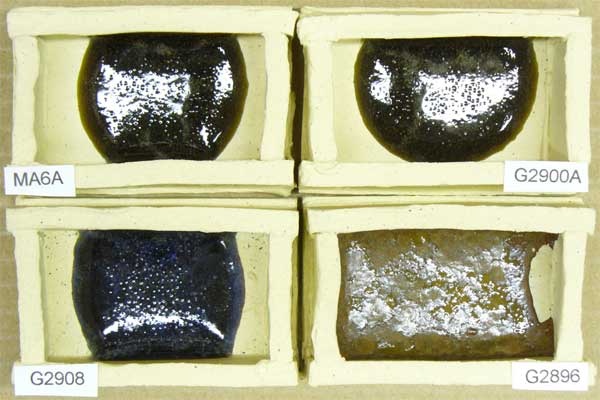
Here is an example of a code numbered test bar. The first digit, L, indicates that this is a lab test of a body recipe.
In edit mode it is possible to simply type a code number of any format you like when entering data for a recipe (see the Code # field to the left). In this way you can maintain and assign them manually. However you will find it easier to assign them automatically using the Auto-assigner. It is visible when the recipe is Open (but not in edit mode).
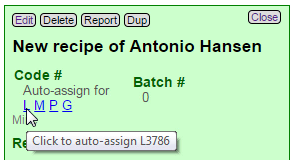
In preview mode you can set a code number with one click. In this example, the cursor is hovering over the L prefix and Insight-live has popped up a tip indicating what code number it will assign if I click.
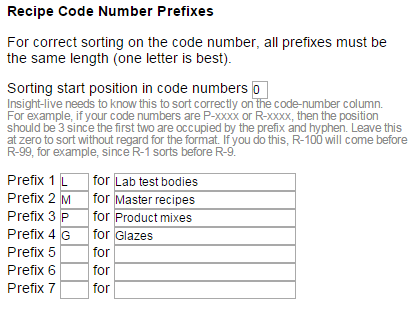
Setting up your Code Number Prefixes
Look for the following in your Preferences dialog. Note that if you are a member of a group, only your administrator has access to this section. You can use whatever letters you like.
Another example of code-numbered glaze-melt specimens that can be searched in my account at insight-live to find out what they are.
Variations
When a recipe has additions (for color, opacify, variegation) these are normally added as Addition lines below the materials (on the panel for that recipe). "Variations" are Insight-live's way of a handling multiple variations to a recipe. This is very common when developing a line of colors on a common base recipe. Each variation can have its own pictures and notes. They are listed in the panel for the recipe (and edited in their own panels).
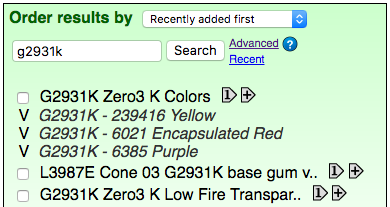
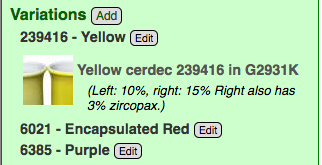
When a recipe has variations they display in the Recipe Manager with a "V". In this case a search has found the parent recipe and all of its variations (these are considered hits because their code number is a combination of the parent code, "G2931K" and a unique extension number). When you click a variation line it is previewed in a panel like a recipe.
When a recipe has variations, they are listed in it's panel like this. Use the Edit button to open the panel for a variation or the Add button to add one.
Variation Panel
The panel is titled as "Variation of Recipe ..." and has a background of slightly darker color than a recipe. It refers to the parent recipe's name and code number at the top and enables suffixing these as titles for the variation. It also shows the materials in the parent recipe (but does not permit changing them).
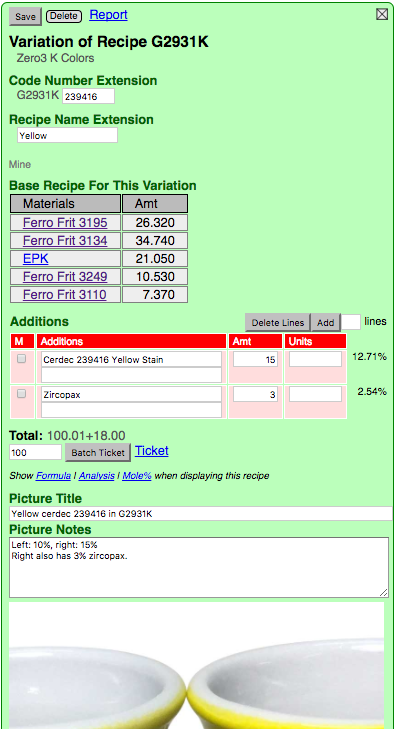
Code Number Extension: When reporting this variation, this will be appended to the code number of the parent recipe.
Recipe Name Extension: When reporting this variation, this will be appended to the name of the parent recipe.
Material Addition Lines: Add lines in the same way you do for recipes (using the Add button). Within each line you can specify a material name, a Lookup (in the materials database), an Amount and a Unit.
Pictures
Upload pictures the same way as for recipes (using the Choose File and Upload buttons). Unlike recipes, you can only edit the picture titles and notes in the variation panel (there is no separate picture edit panel as with recipes). Remove pictures by checking the Delete Picture checkbox and clicking the Save button (at the top of the variation panel).
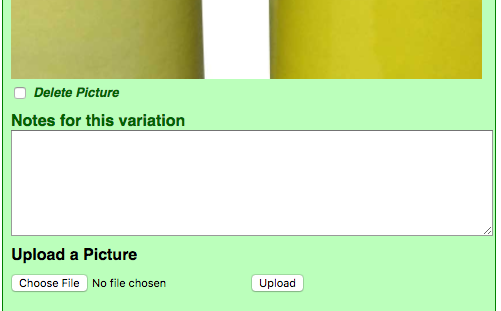
Notes: Notes are specific to this variation (enter information about the parent recipe in its own panel).
Active Controls
Delete button: Shows a confirm dialog to delete the variation and its pictures.
Report link: Click to show a report.
Batch Ticket: Enter the size of the batch and click the button to immediately display a report (the report will have a return button).
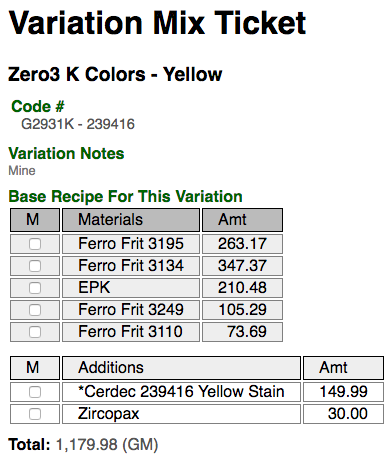
Example of a mix ticket report.
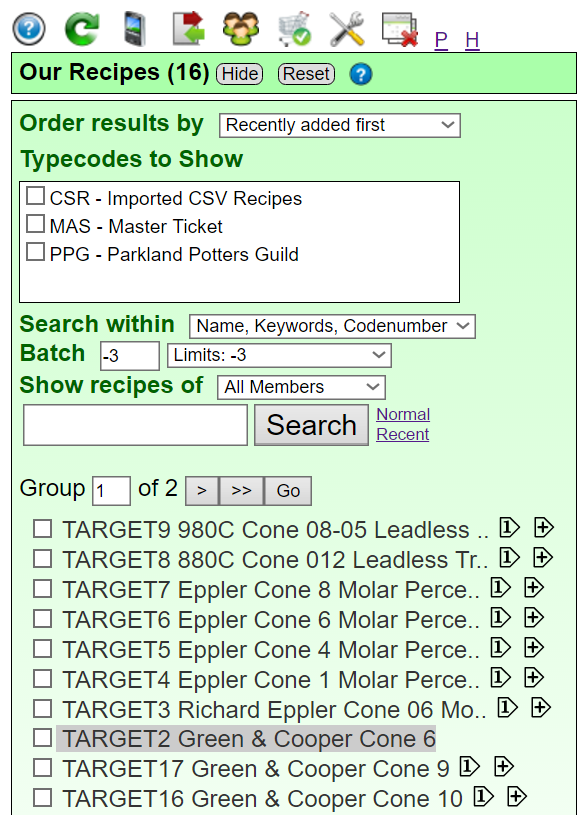
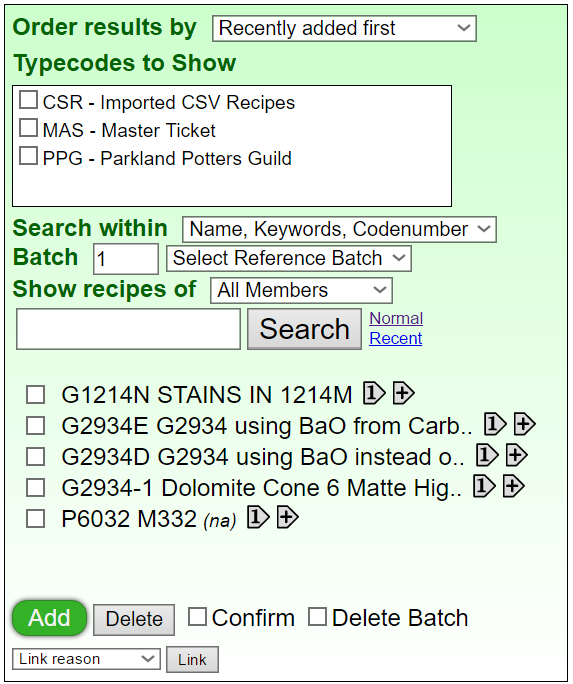
Searching Recipes
The standard search appears by default. Words that you enter are searched (in the code numbers, names and keywords of recipes and the code number and names of variations). Searches are case insensitive and done on all of the words (as opposed to "any of the words"). Only your recipes (or those of your group) are searched (not the reference recipes). The most concise way to search a recipe is by its unique code number (which you should be assigning as you add them).
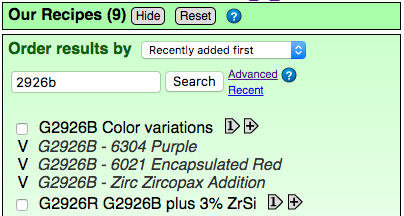
In this search a code number is being sought. The first hit is a recipe that has that number. It has variations, they are all listed below (because they all share that parent code plus their own unique extensions). The fifth hit is a recipe whose name includes the searched code number.
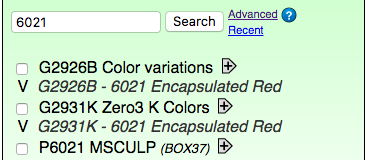
In this search the "6021" was found as the code number extension for a variation of the recipe (code numbered "G2926B") and that parent recipe is shown with it. The "6021" is also found as the code number extension in another variation and as part of the code number of another recipe.
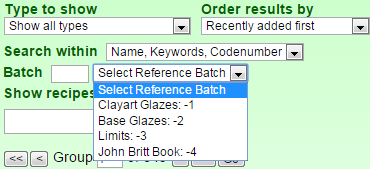
Advanced Search
Click or tap Advanced (to the right of the Search button) to get more search options (the Recent link is used to show a list of recently visited recipes)
Some of these settings are additive to any words being searched, others are not.

Choose the order in which you want to display the list (it defaults to most recently added first).
Limit hits to only recipes having that a specific type (you determine the types in the list using the Typecodes manager).
Choose which fields to search within (these include being able to look within notes, material names in the recipes, storage locations (of specimens), the picture base name).
Enter a batch number (or choose one from the list) to restrict the search (these are assigned to batches during bulk import of recipe data). Reference recipes have negative numbered batch numbers.
If you are part of an Insight-live group, a Members popup list will be available (to show only recipes created by that person).
Click Normal (to the right of the Search button) to go back to standard search. Insight-Live will remove the batch number you entered and change the Search Within option back to the recipe name.
The Recent link (below the Normal link) shows a hitlist of recently visited recipes.
Searching Other Topics
If you are looking for help on technical issues related to solving problems with your glazes or clay bodies, please go to the Digitalfire Reference Database or simply search on google. You will find that hits our reference database will almost always be in the top ten and have the most practical information of any of them. You will also notice that none of our pages have spyware or adware or ads of any kind from outside vendors.
Organizing Recipes
Insight-Live is a database and it uses database methodologies to classify and organize records so you can find them. When one is dealing with a few hundred things it is viable to organize them into folders. But this becomes unworkable as the number of items increases and many of those belong to more than one category. Insight has many ways or organizing and finding recipes. Here are most of them.
Methods of Organization of Recipes
- Give each a code number. In preferences you can set up various prefixes for code numbers. And advantage of this method is that the code number can be written on all test and production specimens, thus connecting them to records in Insight-live.
- Use keywords in recipe names and descriptions. For example, if the name of all your master recipes begin with the word "master", that can be searched.
- The search in the recipe manager has alot of features that enable finding recipes quickly. For example, you can order the search list by creation or modification date, by code number, alphabetically by name, etc). You can search within specific fields, even the materials in the recipe.
- Recipes can have typecodes, they are analogous to folders. Search can find them.
- Link recipes to a master recipe, then when you display the master the links for all the connected ones are there to click.
- Link recipes to projects, find the project and you see all the recipes connected to it.
- Assign recipes to batches and search for the batch desired.
Many of these suggestions also apply to organizing materials, pictures, projects and firing schedules.
It is helpful to compare Insight-live.com to google.com. Long ago, competitors to google classified the web and people drilled down to the page they wanted by clicking through hierarchies of categories. Then google introduced the idea of a simple search, it proved to be so much more practical.
Limit Formulas
In desktop Insight target formulas appeared in the formula list beside the two others. They were found by searching in the recipe dialog.
In Insight-live you search for them in recipes using the Advanced search. They are batch number -3. Open the desired one and it will appear in its own panel (the one on the left below).
Here is an example: The target panel is on the left and the recipe panel is on the right. It is important to compare the correct columns. In this example the target panel is a unity formula, that means we need to compare it with the first "Formula" column in the recipe panel. For example, this recipe has 0.54 CaO and the target is 0-0.55.
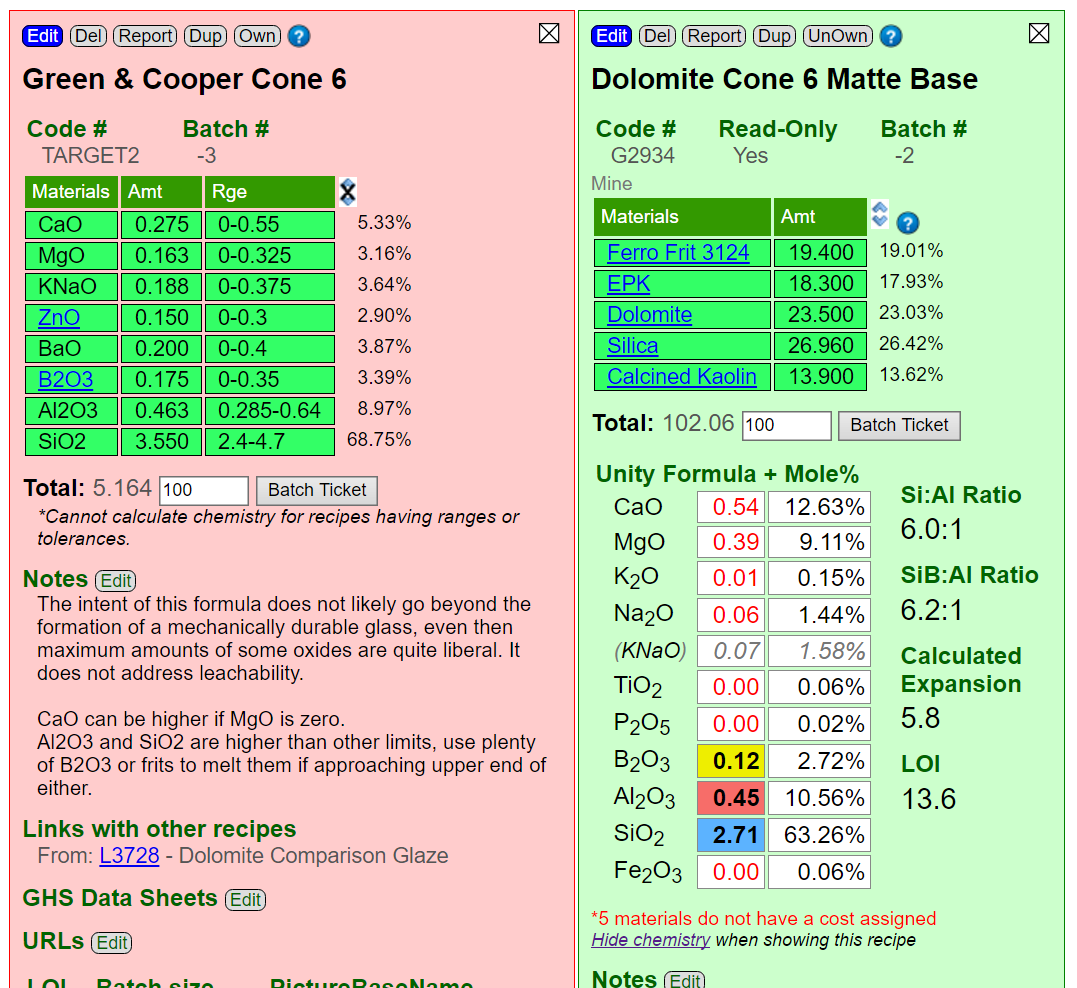
A Word of Caution: Please read the glossary entry at digitalfire.com on limit formulas. They may not be what you think they are.
Recipe Batches
Imported recipes are automatically assigned a batch number. You can see what batch a recipe belongs you when you preview it, you can often see what type of file the recipe was imported from by checking its type codes. It is normal to import a recipe batch, check how it went, and if there were issues, delete the batch and then reimport using different settings.
To delete a batch of recipes
- Make sure that the "Show Delete checkboxes in Recipe Hitlist" and "Show Delete Confirm checkboxes" settings are turned on in Preferences
- Close all recipes (it is OK if a recipe is being previewed)
- Click any recipe in the batch to preview or open it and see what batch # it is in (if you do not know)
- Search for that batch by entering the batch number in the Batch blank (above the list of recipes, click Advanced Search to display it if needed)
- Click the Search button
- Verify that the recipes found are the batch you want to delete
- Below the list of recipes, check the Confirm checkbox and the Delete Batch checkbox (this checkbox is only visible if you are currently searching a batch)
- Click the Delete button.
Change the batch number of a recipe
Click the blue Edit button to edit the recipe panel and you can change it.
Calculations
If you have heard that Insight-live does not do glaze chemistry you have heard wrong. It is an ideal tool for exactly this.
Go to Topic: Calculations
Exporting to Desktop Insight

Recipe data is exported using a drop-down menu below the list of recipes in the My Recipes manager (the list will only be available if all recipe panels are closed). You can export all the recipes or just the selected ones (to do the latter you must have the Show checkboxes in recipe hitlist checked on your preferences page).
Data can be exported in CSV or Insight Recipe Library formats. The CSV format delivers the same column schema as expected for the import of a Generic CSV Recipe File (material columns/recipe rows).
Limitations: Insight-live has a robust format for storing recipe lines and is thus a superset of most other products. It does not include all details that can be defined for each recipe line (e.g. units of measure, tolerance, range, phantom, order) in exports. In the case of CSV, the recipe is converted to the default units for all materials) and only materials and amounts are exported. Desktop Insight cannot read the CSV file, but recent versions can open a recipe library (which is a standard XML desktop Insight recipe file containing multiple recipes). Pictures are not exported as part of the file, but they can be moved separately and will link if put in the right folder.
More info can be found at the Exporting Data topic.
Deleting Recipes
To Delete One Recipe
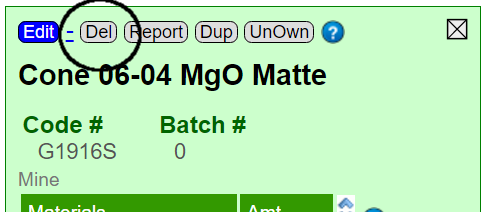
Open the recipe and click the Del button at the top of the recipe panel.
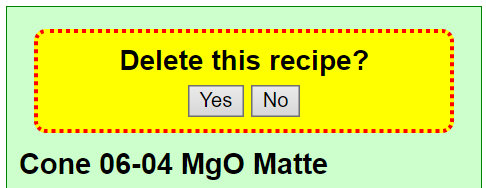
Click Yes to confirm.
Deleting Multiple Recipes
Turn on "Show checkboxes in recipe hitlist" in Preferences. The recipe list will now display checkboxes in front of each item.
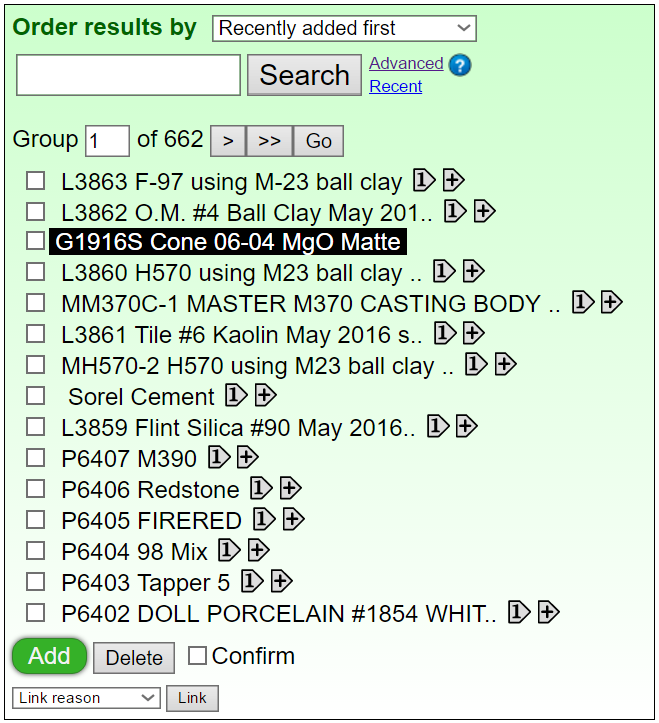
- If necessary do a search to limit the list to containing the recipes you want to delete.
- Click the checkbox for each you want to delete.
- Check the Confirm box below the list.
- Click the Delete button.
Deleting an Entire Batch
Recipes are normally imported in numbered batches (it is thus common to repeat multiple imports of a batch until the settings are right). The batch number to which a recipe belongs can also be changed when editing it. To delete a batch:
- Click Advanced (beside the Search button) to display the advanced search options.
- Enter the batch number to find.
- Click the Search button (all the recipes in that batch will display).
- Click the Confirm checkbox and the Delete Batch checkbox (below the list).
- Click the Delete button.
Reference Recipes
Reference recipes are visible by everyone, they cannot be edited or deleted.
Pictures
You can document recipes, variations, firing schedules and projects with PNG or JPG format pictures (as many as needed for each). Each picture can have its own caption and notes. You can "crop-and-upload" or "upload-and-crop" (please crop to speed up the server and minimize storage requirements, these reduce the server's environmental footprint).
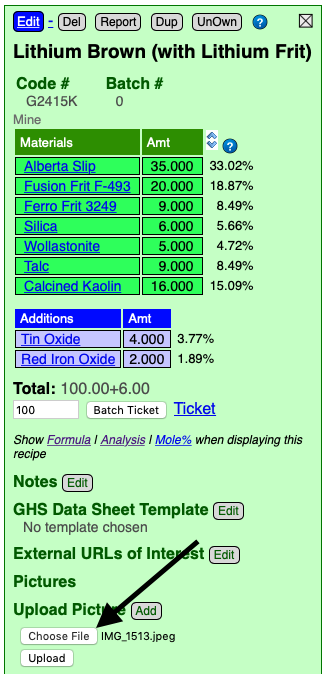
This recipe is open (but not in edit mode).
I have already clicked the Choose File button. A file window appeared and I used it to navigate to the location of the file and opened it. When the file window closed my browser wrote the name of the file I chose beside the Choose File button.
Click the Upload button.
The upload process will be quick if you already cropped and saved the file in jpg format. If not, and your phone takes high resolution pictures, it will take much more time.

This is how it looks after the picture is uploaded. You can upload others also.
Click or tap the Edit button above the picture. This will open the picture record in its own panel to the right of the recipe. In that panel, you are working in the Picture Manager.
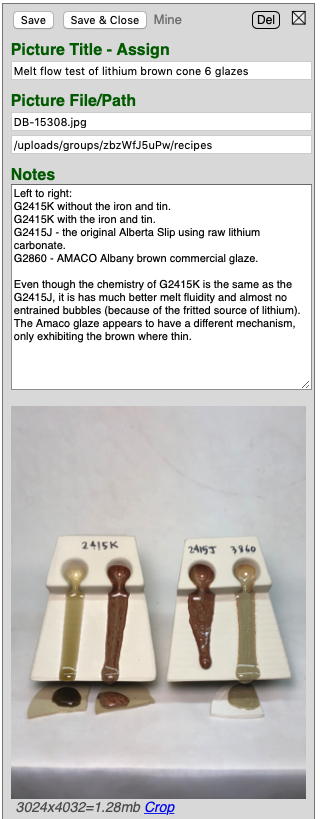
Picture Title and Notes: Describe the picture completely, it should be able to stand on its own since it can be linked to other recipes (or to projects, firing schedules, etc). The detail will also make it more findable in searches in the picture manager.
The pixel dimensions of the image and its file size are shown. Generally there is no benefit to pictures over 1600 pixels high or wide (cropping out unneeded parts will often reduce the dimensions well below this anyway).
Cropping Pictures
See the Picture Manager for details on this. It is important to crop pictures for better display, faster operation and environmental reasons.
Paste a Recipe From the Clipboard
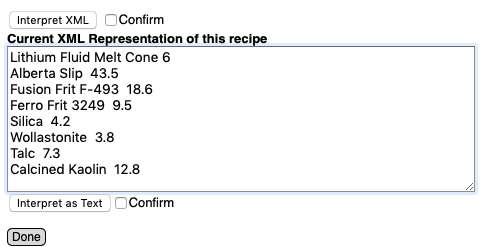
For either method of pasting your first need to add a new recipe (or go to the one you want to replace and open it in a panel). At the bottom of recipe panels there is a heading "XML and Text Import/Export" with an accompanying Import button. It produces a dialog like the following. Paste your text of XML into the box, check the Confirm checkbox and then the appropriate interpret button. The information will be parsed that the recipe in the panel of the Import button you click will be replaced.
Pasting a Text Recipe
The recipe title and materials should appear as shown, check the Confirm checkbox and click or tap the Interpret as Text button.
Video
Pasting an XML Recipe
Paste the XML into the interpret box and use the Interpret XML button. The XML can come from another recipe in Insight-live (it displays in the import box automatically) or from recipes in the Digitalfire Reference Library.
Video
More Information
When Insight recognizes all the materials correctly it can calculate the chemistry of the recipe. It recognizes unabbreviated material names that are "correct and complete" as well as many variants. For example, "Calcium Carbonate" and "Whiting" will both work. Also, name-brand materials like "Custer Feldspar" will be recognized. Materials that are not recognized are not linked, edit their names (either before or after import). If needed, open the materials panel (blue title bar) and search the reference materials to find proper spelling.
Many websites will purposely display recipes as photos so they cannot be copied as text. Others display recipes in tables and browsers do not know how to copy these such that amounts are placed beside material names correctly. Others place hyphens, colons, periods, etc. between material names and amounts so you have to edit these in the import box before clicking the interpret button.
Reference Recipes
Insight-Live has reference recipes that you will not see unless you specifically search for them. In the Advanced Search click the popup next to the Batch blank. These recipes are stored in negative numbered batches (you assign positive numbered batch numbers when you import batches of recipes). When you select an item in the list, its batch number will be inserted into the batch blank.
Test Results Data
More information coming soon.
Click here to watch this at youtube.com or click here to go to our Youtube channel
Printing Reports
Since Insight-Live is a web site, it is not directly connected to your printer. Reports are thus printed to a web page and you must use your browser's print feature to route them to a printer.
Standard Recipe Report

To print a standard recipe report, just click the Report button at the top of a recipe panel. Reports include chemistry, pictures and notes.
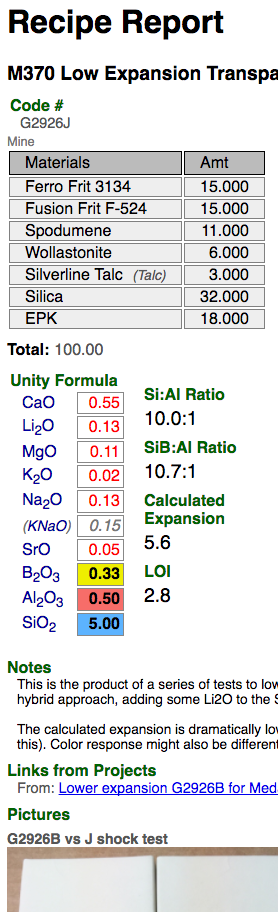
The report will open in a new tab or window in your browser and display the report like this. To close the report just close that browser tab or window.
Print a Mix Ticket
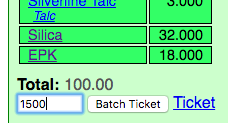
To print a mix ticket enter the total (in the total default units as defined in the Units manager) and click the Batch Ticket button.
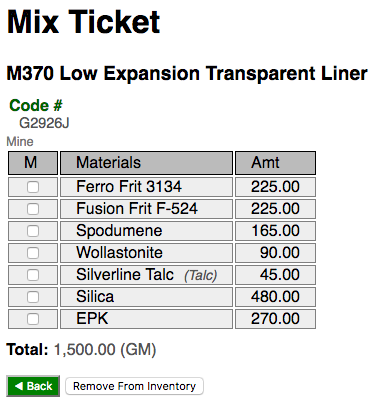
Mix tickets do not include pictures and notes. The report will open in the same browser window or tab and it will have a Back link at the bottom (to go back to the recipe).
Publishing Reports
Do not publish reports on your web pages, they can have links that go back into your account (although these will not log the person in, they will just go to a dead end). Use the Shares Manager instead.