Click the ![]() icon (on the upper-left of the Insight-live home page) to go to the Import Manager page. Then click the Recipes Import link at the top.
icon (on the upper-left of the Insight-live home page) to go to the Import Manager page. Then click the Recipes Import link at the top.
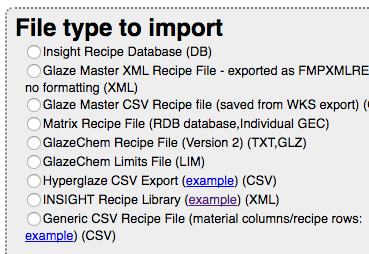
The Import Manager

The Import Manager panel that appears on the left.
The most common use-case is doing a one-time import by simply checking the appropriate radio button (for the type of file you are importing), clicking the Choose File button and then clicking the Upload button. If you need to import from multiple file types, in multiple batches or classify/mark incoming recipes then use the other options.
Other Options
- Assign typecodes to imported batches (classify) and search on these later (importing in batches affords finer-grained control of typecodes).
- Assign a batch number to imports. This number is important if you later to restrict searches to a batch or remove all the recipes in a batch (in order to re-import with other options). When you edit a recipe you can manually change its batch number.
- Prepend character sequences to recipe names during import.
- Include a note with each imported recipe.
A Typical Import Cycle
- Choose the type of file
- Choose the typecodes to apply and set the batch number.
- Click the Choose File button and find the import file on your computer.
- Click the Upload Now button.
- Check the Import Log (it appears in a panel on the right) for any problems (eg. if you need to add typecodes of specific abbreviations or labels)
- Return to the Recipe Manager and search for the batch number assigned. Check recipes for import quality. (also check if any foreign language characters are not rendering correctly, you may need to check the UTF8 conversion checkbox.
- Delete the batch in the Recipe Manager.
- Return to the importer and add the needed typecodes and import again.
- Repeat until all recipes correct.
Quickly Import from Desktop Insight
Most often you will simply be importing the INSIGHTDATA.DB file from your desktop Insight (this file is an industry-standard SQLite database file, it contains every recipe you have entered). This process normally takes only ten seconds.
- Click the first Insight Recipe Database radio button.
- Click the Choose File button and tell it where the file is (it is in your documents/insight folder).
- Click the Upload button.
If you are unsure, consider visiting your account at https://backup.insight-live.com and trying the import there first (it is the backup site so any changes you make there will be wiped out at the next nightly backup).
You can also watch this at Screencast-o-matic.com
CSV Format
The last format, CSV, empowers you to consolidate your data using spreadsheet software (all spreadsheets can export to this simple format). Many engineers and consultants have extensive data in spreadsheet format and these can be rearranged and consolidated to match the format needed by Insight-live.
Important: Just because you have a bunch of recipes in a CSV file does not mean Insight-live can import them. CSV is only a way of describing columns and rows of information. But it matters what the columns and rows are and how they are organized. Click the example link to download a sample file (as described below, the format of yours needs to match that). Note that the "Import Manager" page has additional information that you also need to know.
CSV stands for "comma separated values" (the columns are separated by commas and column values are enclosed in quotes). Files have two header lines, they must be present:
- "Name" is mandatory as the first column name, it titles the recipes. The "keywords" (or description) column is optional. If it is not supplied color, cone and type will be combined to form the description. Code, date, batch, picture, typecodes, location, comments will be mapped into the corresponding fields in Insight-Live.
- The Mapping header row is also mandatory. It must start with "Mapping" and contain tags to ignore columns or map them to notes. Remaining columns are materials. The "firing" column will be mapped into the notes (with a heading matching the name of the column). Other columns will be ignored.
Within your spreadsheet software choose "Save As", choose file type of CSV. The save process will be multi-step and you will have an opportunity to set the field delimiter (as comma), and set the text delimiter (the text delimiter is actually optional but must be used when numbers employ commas as decimals).
If I do not like the way the import went: The batch number that you can set during import is the key to removing an import. At the Insight-live home screen click "Advanced Search" in the recipe manager and search the batch number. Click "Delete Batch", confirm and delete. You can also experiment with the import by logging into your backup account at https://backup.insight-live.com (that gets replaced nightly by the data at insight-live.
This video will show you step-by-step.
Importing Other Formats
The following formats are supported: HyperGlaze, GlazeGhem, GlazeMaster, Matrix, INSIGHT XML recipes, INSIGHT SQLite DB files and CSV spreadsheet files. Desktop Insight files are the easiest to import (they are plain text and formatted in industry-standard XML). However the other formats have varying degrees of difficulty depending on how proprietary and closed they are and whether they are the native data file for the system or an export format (e.g. GlazeMaster). GlazeChem files are the most open and easy to parse (thank you to the author!) and the most difficult is Matrix (much hacking was required to learn to extract the key information (e.g. materials, amounts, notes). Where pictures are involved we can advise you on how to upload these as a separate batch and connect them to their recipes correctly.
If you need extra help importing data please contact us. We appreciate this because it affords opportunity to spot any issues with importing.